Approved
Department
forest complex
Ministry of Economy
Russian Federation
December 15, 1997
Agreed
Central Committee of the Workers' Trade Union
forestry industries
Russian Federation
December 17, 1997
STANDARD INSTRUCTIONS
OCCUPATIONAL SAFETY FOR VENEER CUTTERS
AND COVERING MATERIALS ON SCISSORS
TOI R-15-079-97
This Instruction was developed in connection with the adoption of Inter-industry rules on labor protection in logging, woodworking industries and during forestry work, approved by Resolution of the Ministry of Labor and Social Development of the Russian Federation dated March 21, 1997 N 15, and in accordance with the Regulations on the procedure for developing and approving rules and instructions on labor protection, approved by the Resolution of the Ministry of Labor of the Russian Federation dated 07/01/93, registered with the Ministry of Justice of the Russian Federation 07/13/93 N 302.
The instruction was approved by the Forestry Department of the Ministry of Economy of the Russian Federation on December 15, 1997 and agreed upon by the Central Committee of the Trade Union of Forestry Workers of the Russian Federation on December 17, 1997.
The instructions are intended for managers and specialists of logging, woodworking and forestry organizations of all forms of ownership.
1. General safety requirements
1.1. General safety requirements are set out in the Instruction "General safety requirements for professions and types of work in furniture production."
1.2. Hazardous production factors: moving machines and mechanisms, moving parts of production equipment, moving materials.
Sources of factors: cutting tool, knife, counterweight, belt and gear drives.
Effect of factors: the possibility of contact between the hands of the worker and the blade of the knife; possibility of contact with moving and rotating parts of equipment.
1.3. Personal protective equipment: cotton suit; combined mittens.
2. Safety requirements before starting work
2.1. Check the sharpness of the cutting tool and make sure there are no cracks on the knife.
2.2. Check the strength of the knife on the slider.
2.3. Monitor the serviceability of the device, which prevents the pressing and cutting mechanisms from starting when your hands are in the work area.
2.4. Make sure that the knife guards, belt and gear drives, the pit (along its perimeter), and the pedal along its length are present and in good condition.
2.5. The mechanisms for pressing and cutting the package must be activated using two-handed control, eliminating the possibility of turning them on with one hand.
2.6. Check the serviceability of the device for holding the knife traverse in the upper position from arbitrary lowering.
2.7. Test idling and stopping the electric motor, raising and lowering the clamping and knife traverse.
2.8. Removing and carrying the knife must be done using a special device.
3. Safety requirements during operation
3.1. Do not leave the scissors turned on without supervision.
3.2. Do not transfer veneer packs for secondary cutting through the gap between the scissors.
3.3. When cutting veneer less than 70 mm, use a template.
3.4. Periodic removal of veneer waste from the knife should be carried out using a special sweeper in a box intended for this purpose after the scissors have completely stopped.
4. Safety requirements in emergency situations
4.1. Turn off the equipment.
4.2. Post a table about the malfunction of the machine or equipment and report it to immediate management.
4.3. In the event of a fire or extinguishing a flame, use a fire extinguisher located nearby.
4.4. The victim or eyewitness must notify the appropriate work manager of each accident or poisoning.
4.5. The employee must be able to provide first aid. Such assistance is provided immediately, directly at the scene of the incident and in the following sequence: first you need to eliminate the energy source of injury (turn off the engine, stop the mechanism, remove the victim from under the car, heavy object, etc.). Providing assistance should begin with the most significant thing that threatens life or health (in case of severe bleeding, apply a tourniquet and then bandage the wound; if a closed fracture is suspected, apply a splint; for open fractures, first bandage the wound and then apply a splint; for burns, apply a dry bandage ; in case of frostbite, gently rub the affected area using soft or fluffy tissues). If a spinal injury is suspected, transport the victim only in a lying position on a rigid base.
4.6. After providing first aid, the victim should be sent to the nearest medical facility.
5. Safety requirements after completion of work
5.1. Turn off the equipment. Wait until it stops completely. Put in order workplace: remove tools, devices; clean the machine from dirt and dust; wipe and lubricate the rubbing parts of the machine; Carefully fold the finished parts and the remaining material.
5.2. Remove wood waste (sawdust, shavings, dust) from the surface of the equipment, as well as from workwear, with a brush, sweep, or using vacuum cleaners.
Blowing the machine and clothing with compressed air is prohibited.
5.3. Place the rags used during work and when cleaning into a special metal box with a closing lid and take it outside the workshop to a specially designated place.
5.4. Wash your hands with warm water and soap.
5.5. Report any noticed shortcomings in the operation of the equipment to the shift worker or foreman.
I started this section to avoid repetition in different articles. I veneer various products quite often, and instead of describing the veneering process in each master class, I will simply provide a link to this article. The section will be updated and supplemented as photos (and possibly video) of material become available. And of course, as you use other methods of veneering and working with veneer.
Veneer can be sawn or peeled. Sawn veneer, as a rule, has a thickness of 3 mm. Peeled veneer - less than 1 mm. I’ll talk about rotary-cut veneer for now, partly because I use it more often, and veneering with rotary-cut veneer is more common. I’ll return to the conversation about sawn veneer a little later, when I have enough material for publication and work experience.
Typically, natural peeled veneer is not very wide - only 100-140 mm, with rare exceptions it is slightly wider. The length of the knoli (pack) of veneer can be different. From one and a half to three meters.
I’ll start my story with simple operations - veneering a workpiece (plane) with natural peeled veneer 0.6 mm thick.
In order to veneer (cover) a workpiece of larger width with such veneer, strips of veneer must be “jacketed” (joined together). Since the strips themselves do not have an ideal edge when purchased, you first need to trim this edge. Otherwise, after assembling (connecting) the strips together, there will be a gap between them. There are many ways to straighten the edges of veneer, one of which is to joint the edges.
Edge jointing.
 To start, I usually make two blocks of pine needles. The bars must be smooth in all planes and have an angle of 90 degrees. Between these blocks I crimp the veneer strips using lever clamps, if the width of the veneer strips allows for installation. In the case of jointing wide strips, you can use a beam with a strong curvature and turn it so as to increase the pressure on the middle.

 Then I fugue the veneer strips, along with the bars. If you look at the surface during the jointing process, you will see that the edge of the veneer is aligned with other, tightly pressed sheets.
You need to strive for almost complete surface uniformity. At the same time, it is important not to overdo it, because if we joint for too long, we can “fill up” the corner, which will again lead to unnecessary cracks, or disrupt the intended design.

 Next, we lay out the veneer, turning the strips over and matching the “native” sides. We check the quality of the edges by folding and pulling the strips together. The method of making a veneer shirt can be absolutely any. Traditionally, veneer is assembled using a “book”, that is, the “native” sides of the strips are combined—in a mirror image.
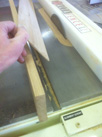
Another way to process veneer edges before setting them into a “shirt” is to trim with a razor.
Cutting veneer with a razor.

 Trimming is done with a very simple device. Essentially, this is a homemade cutter for cutting veneer. A simple razor pressed together with two pieces of any slab material or wood. In my case, these are two pieces of MDF 16 or 19 mm. The cutting edge of the razor protrudes slightly, literally by 1mm. , that is, it does not significantly exceed the thickness of the veneer used in the work.
 First I cut the veneer to the required length. Usually, I make the “shirt” longer and wider than the workpiece by about 10 mm. (5 mm on each side). “Overhangs” (protruding veneer) larger than 5 mm will be difficult to remove accurately. I described in more detail the cutting of “overhangs” and a device for working with edges after veneering in the article

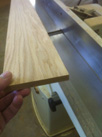
 Next, using the same MDF as a base, we place a second strip of MDF on top, securing it with clamps at the end. We mark the intended cut. In the future, placing a strip of veneer between strips of MDF, we use the top strip as a stop. Pressing it with one hand, we cut the veneer along its entire length. If the veneer strip “walks” a little and moves during the cutting process, you can stick pieces of abrasive onto the top strip from the inside. In rare cases when this is necessary, I glue the abrasive onto double-sided tape - this makes it easier to remove later. The abrasive tightly fixes the veneer strip, does not allow it to move, and the seam between the strips when the veneer is assembled into a “shirt” turns out to be impeccable.
It is important that the MDF strip used as a stop is wide and even. Otherwise, it will be difficult to join two strips of veneer, three will be extremely difficult, and further installation will require subsequent trimming of the outer curved edges.
When cutting through the veneer, the razor leaves a cut on the base (bottom strip) and becomes a little dull. The subsequent cut follows exactly the “knurled track” and does not cause serious changes in the blade of the razor. The razor gets dull quite quickly just on the veneer, because as soon as the cut becomes less than perfect and the hand begins to feel how the razor is cutting through the fibers of the veneer texture, it is turned over. Thus, each razor can be turned over 4 times.
Set of shirts for Gumirka.
 One of the ways to glue veneer when “setting shirts” is to use gummed tape (“Gumirka”). It is usually sold in the same stores as veneer. For work, we also need a sponge (or a piece of foam rubber), slightly moistened with water and a plastic card. A credit card or discount card will do just fine... unless, of course, you don’t mind it. I cut the tape into small pieces, about 40-50 mm long, although it is more convenient for others.


 Pieces of humirka are dipped in a sponge with water and laid out side by side on the table to dry. A lipstick moistened with water has adhesive properties - it sticks. Next, we place the drying lipstick on the seam, pulling up the edges and rubbing it in with plastic. It is important to apply Gumirka exactly at the moment when it is still sticky, but not very wet, otherwise it sticks worse and wets the veneer a little more with water, which is also not very good. It is not very difficult, it is easy to master by selecting it experimentally.
 Well, that’s all, our “shirt” is complete. There is an opinion that when Gumirka dries, it slightly tightens the veneer strips towards each other and the seam becomes better. But either I’m just unlucky, or I come across some kind of humirka that’s not quite right... In a word, no matter how hard I tried, I didn’t notice such an effect. Gumirka is excellent and almost irreplaceable when it comes to marquetry. Thanks to the reverse effect (it can be slightly moistened and carefully removed from the surface), marketers create amazing works. But if your set is a simple “shirt” in one direction, then it will be easier for you to work with masking tape.
Set of shirts on tape.
You can splice veneer strips not only by using gummed tape.

 You can use special tape or simple masking tape to splice veneer. In one of the workshops where I was lucky enough to work, I came across a similar method. Scotch tape is a blue or light brown tape, not very sticky, but quite enough for gluing veneer. The sticker principle is exactly the same as when using a lipstick. Apply it to the seam in small sections, pulling the veneer strips together with your other hand. Some people lightly “grab” the strips with sparse pieces of tape, then glue the entire seam. Some people don't glue the seam. I usually stick tape with a slight overlap on the previous section. This makes it easier for me to remove the tape from the workpiece after veneering.

 Using tape, of course, allows you to increase the speed of typing shirts, but this technique has one significant drawback. I was strongly advised not to try to sand the tape after veneering with a sanding machine, explaining that traces of the tape (glue) may remain and appear after varnishing.
The adhesive tape must be removed, and the glue comes off along with the tape, leaving almost no traces on the workpiece. I tried using simple masking tape for the same purposes, it seemed stickier to me. When removing it from the workpiece, it strives to tear out the veneer fibers from the junction of the strips. In the case of colored tape, this effect was also present, but in a much less pronounced form.
 Thus, the process of setting the veneer into a shirt took me approximately the same time as when using the gumirka, only I glued the gumirka longer, and when using adhesive tape I spent time removing it. A simple iron will help you avoid spending a lot of time removing the tape. If you heat it up to a temperature that is warm, but not hot - when your hand does not burn, I place it directly on the veneered workpiece and, moving it, remove the tape. In this case, you can pick it up with a scraper or a blunt chisel and pull. With stronger heating, you can get by with one cycle, but stronger heating is not desirable for the workpiece, and besides, you can overheat the tape, then the effect will be the opposite.
Joining veneer with a manual machine.
There is another way to splice veneer when “setting in a shirt” - use a manual veneer splicing machine. We resort to it when there is a larger volume of workpieces or when the operation needs to be done quickly. Separately, I would like to note that I still like working with gummer or adhesive tape more and it turns out better. The machine, of course, gives greater speed, but if you get better at it, I think the quality won’t be much different.

 So, the machine is a spool of special threads coated with glue (it is a consumable material), placed on top of a simple structure that runs on mains power. The thread is passed through a heating element and becomes sticky. The heating “proboscis”, through which the thread is passed, makes a zigzag movement when the machine moves, applying the thread to the surface of the veneer. And the roller, which is also one of the wheels of the machine, tightly rolls the heated thread, pressing it to the surface.


 The principle of operation is the same as with Gumirka. Pressing the edges of the veneer tightly with one hand, carefully move the machine along the seam with the other.
There are also a great variety of machines for splicing veneer strips, the purchase of which may make sense for large volumes of veneering. I don’t have much experience working with such equipment, or even with a manual machine for splicing veneer, and, in general, I don’t have any desire to purchase them. For my tasks, the “shirt set” with masking tape is what suits me best so far.
Gluing the workpiece with clamps.
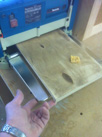
Since not every workshop has a heavy press, I will describe one of the gluing methods - veneering with clamps. A pre-prepared beam (45x140x600mm), in the amount of 4-5 pieces, is placed on the work table, on which a sheet of slab material is placed, in our case it is a sheet of chipboard (40x620x1800mm.) The bars (45x70x600mm.) are prepared in the amount of 10-12 pieces. I usually lay newspaper or other paper over a sheet of chipboard. I try to avoid large quantity paper, one or two layers is enough. The paper is needed to prevent excess glue from getting onto the surface of our improvised press and sticking the workpiece to it. The paper also absorbs excess moisture and allows the workpieces to stick a little faster than in the case of linoleum or film.
 So, evenly apply glue (in our case it’s regular PVA) onto the surface of the workpiece using a roller. There is no need to pour a lot of glue, this can have a bad effect on the quality of gluing or, if the glue is too runny, it can simply “break through the veneer” - the glue can come out on the front sides of the veneer surface, penetrating through the pores of the wood. The workpiece, if it is lined on both sides, can be placed on a special device. This will allow you to apply glue to both sides of the workpiece before placing it in the press. It is important that the time between applying the glue and placing the workpiece under pressure is as short as possible. Otherwise, if water-based glue is used, it will weather and lose its adhesive properties.

 Next, on a previously spread layer of paper, we spread the “shirt” with Gumirka or threads in the direction opposite to the one being glued. That is, out. Thus, the adhesive thread or gummed tape ends up on the front sides of the product. We place our blank coated with glue on the veneer, cover it with another “shirt”, lay down a layer of paper and place another sheet of slab material on top. Next, we crimp both sheets, with the inserted workpiece, using bars and quick-clamping clamps. In this case, the bars act as a distribution of compression over the entire surface of the sheet, and not just along the edges. The remaining free space between the bars can be compressed with whatever is at hand, but there is no particular need for this.
The workpiece is usually under pressure for at least 25 minutes, and is usually left for 30-40 minutes. If an industrial press is used, the drying time can be significantly shorter. This method is quite cheap, but very long. It is only suitable for you if you need to veneer several pieces, and if it is not possible to use a vacuum, pneumatic or hydraulic press.
Veneering in the press.

 It happens in exactly the same way as when veneering with clamps, only much faster and with less labor. In the workshop where fate brought this cold, homemade pneumatic press. The press was described in detail in the article - Linoleum is spread on the surface of the press, then polyethylene - so as not to spoil the linoleum and not to spend a lot of time cleaning it from glue. When using polyurethane adhesives, polyethylene is required; removing drops of glue from linoleum is extremely difficult. Next, the blanks are covered with another sheet of polyethylene and linoleum.
The holding time in the blank press can be reduced if a heating film is used. I can’t say exactly the heating temperature, I haven’t measured it... warm, but not hot. The film came to the rescue when the low temperature in the workshop did not allow veneering at all. The glue was heated with warm air and this film was used for veneering.
 For veneering I most often use kleiberit 303.0 glue and usually d3. If you didn’t have time to veneer all the blanks, and some of the work is left for tomorrow, and you’re too lazy to dry the roller in the morning, you can simply wrap it in stretch. This way, the glue will not dry out overnight and the roller will not be damaged. In addition, 300-400 grams of glue always disappear on the roller, which is also not very pleasant.
Finishing the surface of the workpiece with “Deck”
As promised, I will continue to edit and add to the section.
I often come across the fact that covering the surface of a product with “Deck” (solid strips, more than 2-3mm thick) is often equated to working with veneer. Experienced craftsmen and carpenters often correct me when I call material 2-3mm thick “deck”. and insist that it is just thick veneer. I won't argue, but I'm used to it. Both in this article and in other articles on this Internet resource, I call a deck a strip of thick veneer from 2.5 mm, usually sawn veneer.
Selection of material.
I believe that the main advantage of “deck” cladding is the ability to select exactly the material that the artisan considers appropriate for his product. That is, this method gives more opportunities, but one cannot ignore that labor costs, the amount of material, and therefore the cost of the product will be significantly higher than when working with thin (peeled) veneer.
The second significant advantage is the finishing of the product. When tinting, thin, peeled veneer and solid wood give different shades. With a “dull” enamel color, this does not matter, but when working with stains or tinting, the difference is quite noticeable, and can greatly ruin the appearance of the product.
Another compelling argument in favor of a deck or thick veneer is wear resistance and the possibility of further restoration. Deck is often used on stair treads, chair seats, tabletops, window sill surfaces and shelves. In general, anywhere where the surface may experience heavy loads or wear.
To count the material before selection, you need to determine the width of the strips. I was guided by my capabilities. The maximum possible cut of my circular saw, with a disk in stock, is 60mm. That is, if you cut in two passes, turning the workpiece over - approximately 118-120mm. Thus, I took the width of the tabletop - 500mm, with a small allowance - 520mm. and divided by 120mm. It turns out 4.3 stripes, that is, five. But since the workpiece has two sides (and I wanted to be sure that after pressing the workpiece would remain flat and not warp), I decided to cover both sides with a deck of the same thickness - 10 strips.
I decided to play it safe in case I couldn’t match the color perfectly and use stripes with a width that is a multiple of the width of the tabletop. Otherwise, if a difference in color appears after sanding, stripes of different widths on the tabletop will not look beautiful. That is, the width of our stripes, after all calculations, will be 110mm. (520mm. Divide by 5 = 104mm. and give a small allowance for jointing.
And so, we get the most convenient deck width for this product - 110mm. On average, I get 4-5 deck strips from one piece of board. I don’t like to depend on chance, and again I calmly give the quantity in reserve and cut 3 pieces of board. This is approximately 12-15 deck strips. The stock makes it possible to select more beautiful stripes and avoid accidents during further processing. Considering the length of the table top is 1000 mm, I had to use more than one board, because with a finished size of 1000 mm, I need a deck approximately 1150 mm long. In further processing (reimus), I will need a margin for the cut. My thickness planer makes a “step” as it enters and exits the workpiece.

 Board 30mm thick. I spent quite some time choosing the one for the dresser top. There was quite a lot of material and it was an unedged board, with knots, sapwood and wane.
Making a “deck”


Next, the prepared bars “bloom” into strips. If the final thickness of our “deck” is, for example, 3 mm, then the thickness of the strips that we saw should be approximately 3.5-4 mm.
I make a cut to the middle of the workpiece, turn it over, and cut again. The same thing happens on the other side of our workpiece. This way we get two sawn strips of 3.5-4 mm. and the remainder, which is jointed again. If we want to get 5 stripes from a 30 mm board. it is necessary to joint only partially and the thickness of the strips at the exit from the sawing machine is 3-3.5 mm.The operation is quite traumatic and dangerous. You need to work carefully, using a pusher and glasses. If you do not have basic experience using power tools and a table saw, this method can easily disable you. During work, the workpiece must be limited on all sides by stops, combs and clamps.

 For further work I used a simple device. A piece of board material, in my case plywood. The block on the front side is needed to prevent the device from being pulled into the machine along with the workpiece. This device is needed in order to be able to process workpieces of smaller thickness than the design of the thickness planer provides.
Our strips are processed in a thicknesser on both sides. I paid attention to how I fed the workpiece into the machine and tried to feed it “along the grain” and not “against the grain” so that there would be fewer chips. If chips cannot be completely avoided, strips with large chips are rejected, and the remaining chips are eliminated by grinding and putty.
The sharpening angle of the knives of a thickness planer has a great effect on the quality of gouging. The sharper the sharpening angle, the more explosions and chips there will be. This is purely my observation; many may disagree with it.
At the exit from the thickness planer, a “step” remains on the workpieces, approximately 60-65mm. from the edge of the workpiece. This is due to poor adjustment of the machine's pressure rollers. I just make the blanks 150-160mm longer. and I cut off this “tail” by trimming.


 The strips are crimped with bars and jointed in a “package” until complete homogeneity is obtained. Afterwards the entire stack is turned over, crimped again and the second edge of the strips is jointed. During the work, it is necessary to take into account that the bars slightly lose the correct angle of 90 degrees and they need to be corrected. Also pay special attention to the position of the clamps, otherwise both the clamps and the knives of the jointing machine may be damaged.
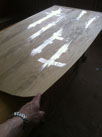
 A set of decks “with a jacket” is similar to a set of “shirts” using simple (peeled) veneer. Only if earlier in our work we used masking tape or gummer, now, when working with the “deck” we use simple tape. The strips are pressed tightly against each other, pulled together with tape, with a slight stretch. The tape tightly pulls the strips together, eliminating minor curvature, if any. Next, I glue the entire seam lengthwise. It is better to remove the adhesive tape immediately after pressing. I've heard that many woodworkers glue strips together. I don’t do this, it seems that so far everything is not bad.
Pressing the workpiece with a “deck”

 For pressing, you can use clamps or a press, if possible. But in any case, it must be taken into account that lining the workpiece with a “deck” will require significantly more pressure than veneering.I have recently had experience with a vacuum press, and find this option to be the most convenient for beginners.

 After pressing, excess deck (overhangs) protruding beyond the workpiece are removed with a milling cutter with a bearing or cut off. It is better to remove the adhesive tape immediately, as it will be more difficult to remove later. Glue and tape residues are removed by scraping and sanding.
It is possible to make a deck yourself, but you must take into account that it takes a very long time, much longer than it is done in production conditions. This only makes sense if the amount of work is not large. If you need to make a tabletop for a chest of drawers, a table or a seat for stools. For a large volume of work, sawing a deck yourself is not profitable and takes a very long time; of course, I would prefer to purchase a ready-made one.
To clarify the above, we made a short video about the veneering process. “Set of shirts” and gluing of blanks in a vacuum press. Also a little about how best to remove masking tape after veneering.
OK it's all over Now. I will supplement and update the section with new photos and video material. Thank you for your attention. I hope it was interesting.
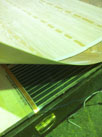
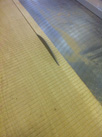
Jointing machine for a pack of veneer.
A new development in the field of veneer cutting, which surpasses conventional scissors and guillotines designed for this purpose in quality and speed of work, is veneer cutting machine LANGZAUNER LZ5/2 with a fitting station. This machine is so efficient that it can cut a week’s worth of veneer in 5 hours.
The operating principle of the machine is very simple. First happens cutting veneer with a circular saw to size with an allowance of 0.15 mm, after which the cut veneer is milled to the depth of the allowance using a jointing cutter at 12,000 rpm. The result exceeds all expectations.
During such procedures, an ideal perpendicular end of 90° is obtained, regardless of the amount of veneer. Veneer cutting machine LZ5/2 with jointing station allows you to perform a number of tasks depending on the client’s ultimate goal. Veneer cutting can be done not only in individual sheets, but also in a whole bundle.
The machine can also be used for rough cutting of veneer. With its help, you can additionally joint the end of a veneer pack or perform the operation of cutting plywood with subsequent reverse jointing.

The machine has a handle with which manual feeding is carried out. The saw and milling unit moves up and down using pneumatic independent manual valves mounted on the unit along compact linear guides. The tool carriage moves along its length along ground, hardened, solid, high-precision linear guides with a diameter of 30 mm.
Veneer cutting machine LANGZAUNER LZ5/2 The station comes with all the necessary tools for maintenance, so it is completely ready for uninterrupted operation.
Technical characteristics of the machine for cutting veneer LANGZAUNER LZ5/2
| Operating voltage | 3 x 400 V +N, 50 Hz |
| Cutting and milling length | 3050 mm |
| Cutting and milling height | 45 mm |
| Sawing station | P = 2.2 kV, n = about 10,000 1/minute |
| Circular Saw | diameter =200 mm |
| Milling station | P = 1.1 kV, n = about 10500 1/minute |
| Cutter size | 85/50/30 mm, 4 HM interchangeable plates |
| Saw motor power | 2.2 kV, 400 V/50 Hz |
| Milling cutter motor power | 1.1 kV, 400 V/50 Hz |
| Adjusting the saw and cutter height | three-stage by means of a revolving stopper |
| Suction connection | diameter 150 mm, lower aspiration pressure: approx. 1780 Pa |
| Required compressed air | 6 bar |
| Aspiration channel with connecting pipes | diameter 150 mm |
| Cable supply to the tool carriage | via plastic chain |

OPTIONS of the LANGZAUNER LZ5/2 veneer cutting machine
| W1970-1350 | Parallel balancing of 3050mm rack Prevents the pressure beam from tilting |
| W1970-1351 | Parallel balancing of 3500mm rack |
| W1970-1352 | Parallel balancing of 4000mm rack |
| W1970-8110 | Double linear guide 3050mm The trolley with the tool moves along 2 rigid and ground linear guides |
| W1970-8111 | Double linear guide 3500 mm |
| W1970-8112 | Double linear guide 4000mm |
| W1970-1400 | Movable front table 3050 mm, Cutting length 3050 mm, connected to milling unit, anodized Loading width 200 mm, horizontal manual movement |
| W1970-1401 | Movable front table 3500 mm |
| W1970-1402 | Movable front table 4000 mm |
| W1970-1500 | Movable front table 3050 mm with pneumatic adjustment, thanks to this device, the front loading table moves automatically forward or backward when using the milling unit |
| W1970-1501 | Movable front table 3500 mm |
| W1970-1502 | Movable front table 4000 mm With pneumatic adjustment |
| W1970-5000 | Cutting table (format) 3050 x 560 mm Dimensions: 3050 x 560 mm for processing 560 mm wide plywood, with integrated measuring scale, parallel guide and pneumatic safety device |
| W1970-5001 | Format table 3500 x 560 mm |
| W1970-5002 | Format table 4000 x 560 mm |
| W1970-5300 | Digital workpiece width measuring device Electronic dimensioning for cutting table with manual width adjustment, Fast and accurate setting of cutting depth, easy maintenance Large digital limit, easy to switch when changing Switching absolute size to composite size when cutting strips based on saw blade thickness Ergonomic arrangement of the entire control device Ability to save parameters when the machine is turned off |
| W1970-5400 | Mechanical adjustment of cutting depth using handwheel |
| W1970-6100 | One-step determination of cutting width, including digital width readings for cutting depth of 800 mm |
| W1970-6200 | Two-stage width adjustment including digital width readout and mechanical handwheel adjustment for fast, efficient workflow 1st stage cutting depth 800 mm 2nd stage free overrun of the machine (for deep cutting) |
| W1940-2130 | Pneumatic saw blade adjustment The saw blade can be positioned pneumatically about 2 mm from the cutting edge to cut away residues |
| W1940-5850 | Carrying out cuts at an angle with a scale of +/-45 degrees, descending |
| W1970-1800 | Laser guide for precision cutting |
| W1960-2500 | Chip removal device Using a special cutter with a powerful drive, irregularities on the edge up to 3 mm can be removed without cutting and moved into the suction hole Thanks to this, the plywood edges are cleaned and the work area is kept clean. |
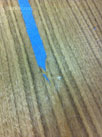
Occupational safety instructions for cutters of veneer and facing materials using scissors
Safety precautions
1. General labor protection requirements
1.1. General safety requirements are set out in the Instruction "General safety requirements for professions and types of work in furniture production."
1.2. Hazardous production factors: moving machines and mechanisms, moving parts of production equipment, moving materials.
Sources of factors: cutting tool, knife, counterweight, belt and gear drives.
Effect of factors: the possibility of contact between the hands of the worker and the blade of the knife; possibility of contact with moving and rotating parts of equipment.
1.3. Personal protective equipment: cotton suit; combined mittens.
2. Safety requirements before starting work
2.1. Check the sharpness of the cutting tool and make sure there are no cracks on the knife.
2.2. Check the strength of the knife on the slider.
2.3. Monitor the serviceability of the device, which prevents the pressing and cutting mechanisms from starting when your hands are in the work area.
2.4. Make sure that the knife guards, belt and gear drives, the pit (along its perimeter), and the pedal along its length are present and in good condition.
2.5. The mechanisms for pressing and cutting the package must be activated using two-handed control, eliminating the possibility of turning them on with one hand.
2.6. Check the serviceability of the device for holding the knife traverse in the upper position from arbitrary lowering.
2.7. Test idling and stopping the electric motor, raising and lowering the clamping and knife traverse.
2.8. Removing and carrying the knife must be done using a special device.
3. Safety requirements during operation
3.1. Do not leave the scissors turned on without supervision.
3.2. Do not transfer veneer packs for secondary cutting through the gap between the scissors.
3.3. When cutting veneer less than 70 mm, use a template.
3.4. Periodic removal of veneer waste from the knife should be carried out using a special sweeper in a box intended for this purpose after the scissors have completely stopped.
4. Safety requirements in emergency situations
4.1. Turn off the equipment.
4.2. Post a table about the malfunction of the machine or equipment and report it to immediate management.
4.3. In the event of a fire or extinguishing a flame, use a fire extinguisher located nearby.
4.4. The victim or eyewitness must notify the appropriate work manager of each accident or poisoning.
4.5. The employee must be able to provide first aid. Such assistance is provided immediately, directly at the scene of the incident and in the following sequence: first you need to eliminate the energy source of injury (turn off the engine, stop the mechanism, remove the victim from under the car, heavy object, etc.).
Providing assistance should begin with the most significant thing that threatens life or health (in case of severe bleeding, apply a tourniquet and then bandage the wound; if a closed fracture is suspected, apply a splint; for open fractures, first bandage the wound and then apply a splint; for burns, apply a dry bandage ; in case of frostbite, gently rub the affected area using soft or fluffy tissues). If a spinal injury is suspected, transport the victim only in a lying position on a rigid base.
4.6. After providing first aid, the victim should be sent to the nearest medical facility.
5. Safety requirements after completion of work
5.1. Turn off the equipment. Wait until it stops completely. Tidy up the workplace: remove tools and equipment; clean the machine from dirt and dust; wipe and lubricate the rubbing parts of the machine; Carefully fold the finished parts and the remaining material.
5.2. Remove wood waste (sawdust, shavings, dust) from the surface of the equipment, as well as from workwear, with a brush, sweep, or using vacuum cleaners.
Blowing the machine and clothing with compressed air is prohibited.
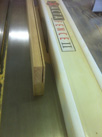
MACHINE SOLD.
Veneer cutting machine (furniture saw) LANGZAUNER LZ 5/2 properly located in Moscow region
Processing of veneer packs: 1. cutting with a saw and 2. jointing with a cutter.
A new development in the field of veneer cutting, which is superior in quality and speed of work to conventional guillotine shears designed for this purpose, is a veneer cutting machine. LANGZAUNER LZ 5/2 with a jointing station. This machine is so efficient that it can cut a week’s worth of veneer in 5 hours.
The operating principle of the machine is very simple. First, the veneer is cut with a circular saw to size with an allowance of 0.15 mm, after which the veneer is milled with a jointing cutter at a speed of 1200 rpm to the depth of the allowance. The result exceeds all expectations. During such procedures, an ideal perpendicular end of 90° is obtained, regardless of the amount of veneer.
The LZ 5/2 machine with a jointing station allows you to perform a number of tasks depending on the customer's end goal. Veneer cutting can be done not only in individual sheets, but also in a whole bundle. The machine can be used for rough cutting of veneer. With its help, you can additionally joint the end of a veneer pack or perform the operation of cutting plywood with subsequent reverse jointing.
The machine has a handle with which manual feeding is carried out. The saw and milling unit moves up and down using pneumatic independent manual valves mounted on the unit along compact linear guides.
The tool carriage moves along its length along ground, hardened, solid, high-precision linear guides with a diameter of 30 mm. The LANGZAUNER LZ 5/2 veneer trimming machine with jointing station is supplied with all the necessary tools for maintenance, so it is completely ready for trouble-free operation.
Specifications
Operating voltage: 3 x 400 v +N, 50 Hz
Cutting and milling length: 3050 mm,
Cutting and milling height: 45 mm,
Saw station: P = 2.2 kW, n = approx. 10,000 1/min
Circular saw: dia.=200 mm,
Milling station: P = 1.1 kW, n = approx. 10500 1/min
Cutter size: 85/50/30 mm, 4 HM interchangeable inserts
Saw motor power: 2.2 kW, 400 V/50 Hz