Quick article navigation
Making paper crafts with your own hands is a simple, inexpensive and very interesting activity for both children and parents. All you need is paper, scissors, glue, and a few fun ideas. In this material you will find 7 step-by-step needlework workshops from different types of paper and 50 photo ideas for your inspiration.
Idea 1. Volumetric crafts
We offer the smallest needleworkers to make a simple voluminous paper craft in the form of such a cat.

Materials:
- Sheet of A4 paper;
- Scissors;
- Glue.
Instruction:
- Download and print the template (see cat template below) on white or colored paper;
- Cut out the template with scissors, and then make 4 cuts in it along the outlined solid lines;
- Bend your neck according to the markup with an accordion and twist the tail;
- Bend the fold lines marked with a dotted line on the paws and glue them to the cardboard.
For older children, there is a more difficult task, namely a master class on making voluminous paper crafts in the form of a bird.

Instruction:
Step 1. Download and print the layout diagram (see below). Please note that the file contains a colorless template so that you can print it on colored paper.
Step 2. Cut out all the details exactly along the solid lines with a breadboard knife.
Step 3. Fold all the fold lines according to the principle: bold dotted line = fold inward, thin dotted line = fold outward.
Step 4. Glue the parts to each other, treating their corners with glue (with Glue inscriptions). Stick to the following order:
- First glue the beak to one side of the bird, then to the second.

- Glue the back of the bird starting from the beak, as shown in the photo.

- Glue on the wings.

- Now take the part, which is the bird's breast, and at one end of it, fold and fix the triangle with glue as shown in the photo.


- Assemble the legs, make sure the knees are at a 90 degree angle, then glue the legs to them.

- Well, that's all, it remains only to glue the legs to the body and your voluminous paper craft is ready. If you wish, you can make a whole flock of such birds in different colors with your own hands.


Idea 2. Wall panels, paintings and applications
It is known that you can draw not only with paints on paper, but also ... with paper on paper. Such activities are no less exciting and useful for the development of hand-eye coordination, fine motor skills, perseverance, the ability to plan your work, combine colors, shapes and materials.
The following selection of photos presents ideas for paintings, panels and paper applications for children of different levels of complexity.


By the way, the application can be made up of parts of the same shape, but different sizes and colors. It can be circles or hearts. The following slider provides examples of such paper crafts and schemes for their manufacture.


And here are some more examples interesting crafts from different types of paper.

Now we offer you to get acquainted with a master class on making an original, but very easy paper craft. We have no doubt that such cute figurines will help instill in your child an interest in reading books.


Materials:
- 1 sheet of A4 color paper;
- 1 sheet of A4 white paper;
- Scissors;
- Glue stick;
- Markers, pencils and paints.
Instruction:
Step 1. Bend one half of a white A4 sheet in half and let the child independently draw the cover of their favorite book on it, also signing the title and name of the author.
Step 2. Cut three long strips from a colored sheet about 2.5 cm wide. You will have 4 parts: 2 strips for the legs, 1 strip for two arms and one rectangle to create the torso of the figure.

Step 3. Take two strips (for the legs), fold them like an accordion, and then glue them to the rectangle torso.
Step 4. Divide the remaining long strip into two equal parts, draw fingers at the ends and glue to the body.
Step 5 Bend the top of the figure to the front side and make her bangs with scissors as shown in the photo.

Step 6. From the remaining half of the white sheet, cut out circles and glue on the figure as if it were glasses.
Step 7. Draw the details: eyes, mouth, nose and temples of glasses with a black marker.
Step 8. Now glue the book to the hands of the figurine and finally put it on the table or hang it on the wall, for example, near the bookshelf.

Idea 3. Hats
All children love games with reincarnations and for this they use everything that comes to hand. To provide a child with props, you can make fantasy hats with him. By the way, such colored paper crafts can be made for one or more children for a performance, a masquerade, a themed birthday or any costume party. In the next selection of photos you can see examples of a variety of paper "hats" - from pirate cocked hats to wigs.


Today we invite you and your kid to make a hat in the shape of a dinosaur head. This workshop is so easy that a child as young as 3 years old will need very little help from you.

Materials:
- 3 sheets of colored paper;
- Glue stick or PVA;
- Scotch;
- Scissors.
Instruction:
Step 1 Cut 4 strips about 3 cm wide along the long side of the paper. Two of these strips will turn into a headband, and the other two into the crossbars of the “cap”, on which dinosaur spikes will be glued.

Step 2 Take two other sheets of paper and cut them into strips about 5 cm wide along the short side of the paper. You can measure and cut the strips by eye, but in the end you should get 5 strips from each sheet. We need these blanks for the manufacture of spikes.

Step 3. Fold each spike blank in half and, stepping back from the fold by about 1.5 cm, draw a markup in the form of a triangle up to the very edge (see photo). Next, just cut out future spikes.

Step 4. Glue the two crossbars, and then glue the spikes on them in a row as shown in the photo below.

Step 5. While the glue dries, fit the two pieces of the headband to fit the circumference of your child's head, and then connect them in a circle with tape.
STEP 6 Now let's get back to the spikes. Turn the crossbar over so that the spikes are on the table and carefully bend each of them (see photo). Form the first spike: cover one side of it with glue and connect it to the other. Use paper clips to secure the spike until the glue dries. Repeat these steps with the rest of the spikes.

Step 7 After the glue has dried, remove the staples from the spikes and simply glue the crosspiece to the headband at the front and back.

Idea 4. Toy figures from a toilet paper sleeve
Toilet paper rolls are great crafts for kids that just need a little embellishment. For example, you can make such wonderful toys out of them.


Paper crafts - the largest section of the category of children's creativity. Despite the fact that paper is the most affordable material for needlework, works made from it can be very different: from simple applications to voluminous models.
And in order to diversify the standard program of manual labor classes, we suggest that you familiarize yourself with the crafts of preschoolers in our section, where you will surely find something interesting and original as an idea for creativity.
Contained in sections:
Includes sections:
- Paper plastics. We master the technique of paper plasticity with children
Showing publications 1-10 of 4659 .
All sections | Origami
 Yes, it was a formidable beginning... And people died without a trace, But even in the darkness we shone Native red star. Ksenia Trofimova Deyanova 2020 marks a significant date - the 75th anniversary of the Victory in the Great Patriotic War. The patriotic upbringing of the younger generation is always...
 Municipal State Preschool Educational Institution "Kindergarten p. Bira" Synopsis of GCD on cognitive development (cognitive research activity) in the younger group. Subject: "Trip to paper kingdom»
Author: Chernigovskaya Marina Dmitrievna p. Bira ...
Municipal State Preschool Educational Institution "Kindergarten p. Bira" Synopsis of GCD on cognitive development (cognitive research activity) in the younger group. Subject: "Trip to paper kingdom»
Author: Chernigovskaya Marina Dmitrievna p. Bira ...
Paper crafts - Collective work on making crafts from paper children's hands in the younger group "We vote for peace"
Publication "Collective work on making crafts from paper children's..."
 Natalia Efrimidi Collective work "We vote for peace" second junior group Program content: Educational tasks: To form interest in the application, curiosity, to cultivate a friendly attitude towards birds, wildlife, environment. Educational...
 MAAM Pictures Library
 This workshop is for teachers and parents. Purpose: for group lessons and individual play of preschool children. Purpose: to introduce children to domestic animals and their cubs, to learn to name and compare them in size; develop curiosity, memory, ...
Abstract of the lesson on the application of paper plastic "Christmas Tree" in the first junior group LESSON SUMMARY Prepared by the educator: Lyubov Vladimirovna Tsibaeva Kemerovo, MBDOU No. 236 Methodical development of educational activities on the topic: “Festive Christmas Tree” Application (paper plastic) Age of pupils: younger (third year of life) Educational ...
 Designing from paper in the senior group on the topic "Butterfly" (origami) Purpose: to teach children how to design a butterfly from paper. Tasks: educational: - learn to fold the basic form of origami - a double triangle; - strengthening the skills of working with paper; developing: - develop ...
Paper crafts - Paper craft with an accordion "Lark"
 March 22, according to the folk calendar, was called Magpie Day. The people associated this March day with the arrival of spring, the arrival of birds, including larks, one of the first birds returning from warm lands. This melodic singing of his is carried far over the expanses of meadows and fields,...
 Application "Hedgehog" Purpose: to create a three-dimensional application from paper strips. Tasks: - introduce the method of gluing paper strips into "droplets"; - teach how to fold leaves with an "oblique accordion"; - develop motor skills of the hand; - develop Creative skills. Required material:...
Abstract of the lesson in the middle group on the application "Mimosa Branch". Application from balls rolled from corrugated paper Abstract of the lesson in the middle group on the application "Mimosa Branch". Target. Run the application "Mimosa Branches" from balls rolled from corrugated paper. Tasks. To consolidate the ability to analyze the sample; develop fine motor skills of the hand, imagination, thinking, creative ...
Do-it-yourself finger paper theater Do-it-yourself finger theater based on the fairy tale "Kolobok" Purpose: to create a paper puppet theater with the joint activities of the children of the older group in the lesson on fine arts. Tasks: -to develop the desire to most accurately convey your idea, to show ...
Probably, every mother in her daddy or on the table has a paper craft from her beloved child. Every eighth of March or the ninth of May, a child brings a beautiful paper flower or a postcard with fireworks from the kindergarten. In general, paper art is popular in preschool.
The site, for example, presents a wonderful idea for making a garland of cute doves. And making flowers from rings will create not only a warm and spring mood in the group, but will also develop fine motor skills, a sense of shape and the ability to combine. The combination of several materials is especially interesting. When they are added together, the pictures are original, voluminous and very interesting.
The goal of a competent teacher is not only to interest and involve the child in making paper crafts, he must provide support in the implementation of any paper idea. The child himself may not be able to cope with a difficult task for him, although he will gladly take up its implementation.
This is perhaps the simplest and least costly type of creativity for children and adults. And probably, there will not be a person who has not launched a paper airplane at least once in his life, and these endless ways to make your liner faster brought so much joy and the first children's victories. In this article, we will look at some interesting crafts that you can easily repeat with your children. Creative activities with paper will be interesting not only for kids, but also for school-age children. Making paper crafts develops fine motor skills, teaches the child to work with scissors, to be neat, patient and attentive.
And all that for children's joy, we need scissors, glue, a couple of sheets of paper, for more advanced users, a couple of colored sheets of paper (cardboard). And you will definitely make your baby happy. In the process of working with very small crumbs, you can remember colors, shapes in a playful way and just have a great time.
Today we would like to offer you some simple techniques that even the smallest can handle to make their own origami.
For the first type of crafts, we need
- Scissors;
- Glue;
- Markers or pens;
- Several sheets of colored paper.
The technique for making such paper crafts is very simple. All we need is to choose our favorite character or animal. Choose the right paper color and get started.
How to make paper craft?
Below, let's take a look at three simple paper crafts: a mouse, a bunny and a bee.
As an example, consider the manufacture of a mouse.
Step 1:
We need to prepare everything necessary for work. To make a mouse, we need to cut out the following elements from paper:
- 1 rectangle (for the body of the mouse). Make the sides of the rectangle pointed, as shown in the example. (this will be the head of the mouse);
- 3 thin strips (this will be the antennae);
- 1 triangle for the spout;
- blanks for the ears 2 larger ovals and 2 smaller ovals, glue them together;
- blanks for the peephole 2 larger ovals in white and 2 smaller ovals in black, glue them together;
- 1 ponytail, cut a slightly twisted strip from paper.
Step 2:
Now that we have all the elements of the mouse, we need to fasten it with glue. We bend our largest rectangle (torso) in half, but do not press it, glue the front part. We are waiting for the glue to set.
Step 3:
We glue all the other elements of the mustache, nose, tail and ears to the finished main part.
Examples of work in a similar technique.


For the second type of crafts, we need
The next type of paper craft is also very easy to make, but very colorful and bright. Such crafts will also look beautiful as bowls for pens and pencils.
- Scissors;
- Glue;
- Markers or pens;
- Cardboard cone.
For example, consider the manufacture of a bee

Step 1:
We need to prepare everything necessary for work. To make a bee, we need to cut out the following elements from paper:
- 1 large rectangle the size of the cone you chose for the craft;
- 3 black stripes;
- blank for wings, make it the same as in the example;
- 1 circle, this will be the face of the bee;
- mustache blanks.
Step 2:
At this stage, we need to take the cone and glue it with a blank of a large rectangle.
Step 3:
While the glue on our cone dries, we can prepare the face of our character. Draw eyes and a smile on the prepared circle, then glue on the antennae.
Step 4:
We continue to work with the cone, glue the stripes characteristic of the bee on it, approximately at the same distance.
Step 5:
We collect our bee, glue all the remaining elements on our cone. The bee is ready.
Examples of work in a similar technique


For the third type of crafts, we need
The third version of crafts is slightly different from the first two. It takes a little more time and patience to make. But these types of paper crafts look very beautiful and stylish. And they are suitable not only for children's creativity, but also for decorating a room and many more different applications.
- Scissors;
- Glue;
- Pencil;
- Several sheets of colored paper;
- Ruler.
As an example, consider the manufacture of a bunny.

Step 1:
We need to prepare everything necessary for work. To make a bunny, we need to cut out the following elements from paper:
- circle, this will be a blank for the face of a bunny;
- 4 oblong ovals for ears (2 a little more, 2 a little less) glue them together to make ears;
Step 2:
We need to make the base of our bunny. We take a sheet of A4 paper, now we need to make something similar to an accordion. So that at the end, our bunny turned out to be even, use a ruler to divide the A4 sheet into even parts. Now, along the marked lines, we bend our leaf into an accordion. To make the bunny bigger and more embossed, you can make several of these harmonicas

Step 3:
The next step in our work is to glue our finished accordions together with glue to make a circle.
Step 4:
Glue the face of our bunny and ready-made ears onto the finished circle. You can make several of these bunnies and fasten them together with a thread and decorate the room with such a cute DIY garland.
Examples of other works performed in a similar technique.


We hope our article was useful for you, leave your comments and send us photos of your work.
Paper is one of the most affordable and versatile types of material used for creativity. Ease of processing, coloring, decorating, ease of cutting, bending, gluing, a variety of floral and decorative characteristics allows you to make interesting paper products together with children of different ages. Such activities contribute to the development of imaginative thinking, attentiveness, perseverance, imagination, and creative imagination. With the acquisition of specific skills, it is possible to create real masterpieces for decorating the interior, which bring individuality and sophistication to the surrounding space.
Original paper decor (photo)
Many small things necessary for solving certain household tasks, if necessary, can be made with your own hands.


Bookmarks
There is a variety of original paper bookmarks that are easy to make with your child. The simplest option is a four-fold square sheet of paper.
Manufacturing process
- The free edge is glued, and the surfaces are decorated with a pattern, an interesting ornament. You can glue cut out bright pictures.
- It turns out an expressive and unusual bookmark in the form of mittens. Draw its outline on cardboard pasted over with plain paper.
- Cut and decorate with various flowers, butterflies. A hole is made at the bottom of the mittens, through which a string is threaded and tied.


Envelopes
Modern methods of communication are moving towards the disappearance of such a method of communication as paper writing. However, it is always nice to receive a small souvenir, a postcard, a commemorative booklet in an envelope that you can make with your own hands.
Do it yourself
- For the activity, you will need scissors, plain paper of the traditional A4 format with pictures pasted in random order from a colorful magazine, a pencil, glue.
- For the template, it is advisable to take a ready-made postal envelope. Carefully paste it, put it on cardboard and circle it.
- After cutting, such a blank will be stored in a folder for creativity and can be used many times. It remains on the manufactured colorful paper from the wrong side to circle the envelope, cut it out and glue it.
- For a gentle message on a sheet of pink paper, you need to draw the outline of a heart. Cut it out, bend the side parts to the center and glue the lower pointed side.
Advice! An ordinary envelope can be turned into a fun craft by gluing paper arms and legs to it. On the front side, draw or glue the muzzle of a cat, dog, hare or any other character.

Unusual is an envelope made up of circles. From the paper used for scrapbooking, using any round object, four blanks are cut out. Fold them in half. Overlapped on four sides, glued in the center. They put in a little thing of a suitable size, bend down the remaining four sides, fix it with a satin ribbon.
There are many options for making your own envelopes. You can even arrange an entire album for memorable events. The number of envelopes for it is regulated depending on the goal setting.


They make special envelopes for money. In accordance with the appointment, pictures are glued, for example, a photograph of the house that you would like to purchase or memorable places where you plan to go on vacation. The advantage of this activity is the possibility of manufacturing envelopes of any size and configuration, depending on the destination.


Vegetables and fruits
It will be possible to quickly give the table a festive look with the help of imitation of vegetables and fruits. This table decoration looks very interesting and unusual, besides, it always attracts the attention of guests.
Procedure
- For carrots, a triangular template is cut out and glued in the shape of a cone. Apply cross strokes with a pink marker. For a children's holiday, eyes and a cheerful smile are drawn on the product.
- A paper circle of the corresponding color will help imitate an apple or an orange. It can also be colored by drawing hair, a smiling face, or pasting suitable pictures.


Postcards
Greetings in the form of a postcard are quite popular. The image on them is not necessary to draw. With the help of colored paper napkins, it is possible to create magnificent semi-volumetric compositions.
For this purpose, on the basis of drawing the outline of the future art object. The napkin is cut into small squares, each of which is turned into a dense lump. It remains to stick them on the postcard, giving the necessary configuration.
Advice! An unusual effect is obtained if the paper squares are folded into tubes and pasted over with them, positioning vertically, for example, the skirt of the depicted ballerina.


Floral motifs
Paper flowers are popular. They do not require special skills and are made quickly enough. Collected in bouquets, garlands or placed in frames in volumetric compositions, these products allow you to create a festive mood. The advantage of such a design is dynamism. It is easy to update and replace.
How to make chamomile
Bring the feeling of a sunny summer day into the atmosphere of any room with lovely daisies, for the manufacture of which you will need white and yellow paper. As additional tools, you need to prepare glue, pencil, compasses.
- Cut strips from white paper. They are rounded on one side, giving the shape of a petal.
- Using a compass, draw and cut out a round center. Alternately, one row of petals is glued to it from the inside. Then, in between, more petals are fixed.


Cactus
Making a cactus out of colored paper is as easy as any other flower. To make it, you will need a minimum set of material and tools, namely: green paper, scissors and glue. The photo below shows a step-by-step tutorial on creating this beautiful desert plant.


wall garlands
To decorate a plain wall, a variety of figures are used, from which interesting garlands are created. Options for them are often hearts.
In order to enhance expressiveness, they are glued from two halves. Then they are attached to the designated place. Volumetric create different objects - droplets, stars, leaves, clouds.


You can cut out colored butterflies using a stencil. After fastening together two cut out templates, the wings are raised to the butterflies.
They are glued in the right order on the tape and placed in beautiful waves on any vertical plane. They can also decorate any object created by oneself.

Butterfly without pattern
Using only small scissors and a landscape sheet, you can make a butterfly without looking for the necessary template. For this purpose, they work according to the following algorithm:
- Cut off the excess from the sheet so as to get a square, which is first bent on one side diagonally. This action is repeated on the other side.
- Then the upper right corner is connected to the lower one on the same side. The same operation is done on the left.
- It turns out a double triangle, in which the lower ends must be bent up so that their tips touch the center of the folded figure, and the sides pass exactly along the fold.
- The resulting part is turned over with the pointed end down and bent so that it protrudes about 5 mm above the upper cut. To do this, pull the lower lobe well.
- The upper corner is tucked to the other side, pressing hard and smoothing the bend to fix it.
- It remains to give the butterfly volume by pressing the corner with your finger and bending the figure along the midline.
If desired, you can decorate the product by painting it. Entire garlands are created from multi-colored butterflies.


Russian oven
Learning Russian with a child folk tale, in which Emelya rode a stove, you can simultaneously create a miracle with him by making a similar product. For the base, take a package of toothpaste. You will also need a black marker, scissors, glue, cotton wool.
Sequencing
- The package is cut into two parts, making one slightly larger than the other. A large part is placed vertically, and the second is glued on one side to it horizontally.
- Cover with white paper. A small elongated box is glued to the top, imitating a pipe. Pastes it with orange paper and draws bricks with a black marker.
- To make a firebox, cut out a small cream rectangle, a black semicircle and an orange stripe.
- Glue on the stove (approximately in the middle of the vertical part), first a cream base, a black part on it, and a horizontal orange strip below.
- Small orange rectangles imitating bricks are glued in a semicircle.
- To make the illusion of smoke, a small fluffy piece of cotton wool is glued to the top of the pipe. Flames of red and raspberry color can be glued into the firebox.


New Year's paraphernalia
On the eve of the New Year, creative activity begins to decorate the premises. It is not always necessary to purchase expensive garlands and other paraphernalia, since you can do it yourself using available paper. More often they choose options with a golden, silver, green, red tone.
Since the products are striking in variety, it is advisable to purchase a set of colored paper for creativity, which allows you to choose the desired shade if necessary.


Christmas trees
Christmas trees are often made to decorate the festive table. The paper allows these products to be made light, choosing the sizes suitable for a specific situation.
There are many options. The simplest are green paper cones mounted on a flat stand and decorated with beads and small chains. You can glue shells, beads, buttons on them. For children, decorations are made from small sweets, from which garlands are collected and placed on a cute impromptu Christmas tree.


A more complex version of a voluminous Christmas tree is made by hand from paper circles. You will need a wooden or plastic stand, wire, scissors, green paper, compasses.
Step by step manufacturing
- The wire must be attached to a stable stand. Draw circles on paper. The largest diameter is 20 cm. Then there is a decrease by 2 cm until a circle with a diameter of 6 cm is obtained. In total, 15 templates are obtained.
- Additionally, cut out another circle with a diameter of 5 cm for the top. In the center of each blank, you need to draw a circle with a radius of 1.5 cm.
- Make notches with scissors, which should reach from the edge of the circle to the drawn line. Each segment is folded into a tube shape, attaching the edges with glue.
- Holes are pierced in the center of the blanks. Start assembling the Christmas tree by placing the largest circle down. Then blanks are strung on the wire as the diameters decrease.
- A cone is glued from a small circle and the top of the Christmas tree is made out. Decorate it depending on the available decorations. It can be beads, tinsel, rain and other interesting things.


They make paper garlands, volumetric balls, flags, snowflakes to give a New Year's mood, which can be placed in any variation on curtains, walls, ceilings, cabinets, shelves.

Interior decorations (photo)
Paper products, subject to a harmonious selection of color shades, are used to decorate the interior. It is enough to master simple technological methods.


Application
The use of the applique technique allows you to create interesting compositions, which, after being enclosed in a beautiful decorative frame, become an interior decoration.
They select any pattern, transfer it to the base, glue the cut-out parts from paper of the desired shade and create a background, for example, a vegetable one.


Complement children's paper applications with bright decorative details. For one unusual option, paper napkins with an ornament are selected. Fold each four times, fix the middle with a stapler, cut out a circle. Then all layers of the napkin are separated, which allows you to get a three-dimensional flower. Add green leaves and place on the prepared background.


Children like to create applications from torn paper. This activity does not require scissors, so it is safe even for younger age. Selecting the necessary shades, small pieces are torn off the paper and glued onto the prepared background, focusing on a pre-compiled color scheme.


Weaving
When acquiring the skills of making paper crafts using the weaving technique, it is possible to create original products that become the central highlight of the interior.
- At the initial stage, they master the interweaving of strips cut from selected contrasting paper in a checkerboard pattern. It turns out a linen pattern.
- Complicating the technique, the rectangles cut out of newsprint are wound onto a pencil, glued on the side to get tubes.
- Blanks replace the traditional vine and can be used for weaving baskets, vases, plates, bird and animal figures. Products are then primed and painted.

Author's decor: manufacturing technique, photo
When wondering what kind of paper crafts you can do with your own hands, it is important to know for which holiday or event you are going to make such a decor. It would be useful to study detailed master classes on making beautiful paper decorations, of which there are a lot on the Internet today.
The versatility and affordability of paper has led to the emergence of a variety of techniques that allow you to organize creative activity with this material.

- Papier mache. When working, the basis of the desired configuration is created. It is pasted over in several layers with paper pieces. When the workpiece dries, it is primed, painted and decorated in accordance with the plan.


- Decoupage. The peculiarity of this type of decorative art lies in gluing ornaments, pictures, interesting patterns cut out of thin paper onto prepared painted surfaces. Often use the top layer of napkins. After the final application of several layers of varnish, a complete decor is created. In this technique, not only vases are decorated, but also furniture.

- Origami. Amazing objects are created by folding paper according to a certain algorithm. In such activities, observation, patience, imaginative thinking develop. The work is carried out according to specially developed schemes.

Origami is a difficult but exciting activity.


- . The basis of the innovative technology of paper plastics is the ability of this material to take on different forms. Craftsmen create sculptures of amazing beauty and expressiveness, three-dimensional compositions.


- modular origami. The connection in a strictly defined sequence of identical paper parts leads to the appearance of openwork products. They use this technique to create a variety of household items, figures of birds and animals, which, with the right choice of color combinations, invariably attract admiring glances.


- kirigami. Enchanting volumetric objects with flowing openwork forms are created using the kirigami technique. They conquer graceful lines, intricacy, dynamism.

- quilling. The basis is strips of paper twisted into spirals. The parts are given the desired shape, and then they are vertically glued to the base. Compositions amaze with refined sophistication, becoming a real pearl of the interior.


Quilling is always colorful and unique crafts.
- Facing. Used for making panels, postcards, decorating frames, albums. Corrugated paper is cut into squares. Then a pencil or any stick is placed in the center of the workpiece. The edges are crimped around the pencils and immediately applied to the base smeared with glue. Only after that the stick is removed. So tightly glue all the details. It turns out a fluffy surface.

No need to strive to benefit from every paper craft. After all, the activity itself brings true satisfaction, allowing you to realize your own creative ideas and ideas. The result is not only the manufacture of some thing, but also the opportunity to spend leisure time with children. It is important to celebrate the success of the child in order to gradually form the motivation for their own creativity.
Today we will learn how to interesting and original crafts from paper with or for children.
And first, let's see what we need for this:
To create crafts, we will use different types of paper and cardboard:
napkins for decoupage on boxes;
newspaper for creating papier-mâché balloons;
old magazines for crafts with beads;
crepe and wrapping paper;
colored double-sided paper;
corrugated and plain cardboard;
paper plates, cardboard tubes, various boxes and much more.
For creativity, the child will need such basic materials and tools as scissors, glue, paints and felt-tip pens.
Does it happen to you that you collect a lot of small necessary items, but there is nowhere to put them? Let's make a fun pocket in which everything will fit and which can be hung in a conspicuous place.
Paper crafts for kids: USEFUL POCKET
What will be required:
colored paper
pencil
lace scissors glue
Work sequence:
Draw the outline of the muzzle of an animal, such as a bear.
Cut out two such shapes along the contour. Make details for the ears and nose, as shown in the photo.

Apply glue along the edge, connect the parts to make a pocket inside. Punch two holes.

Glue on the ears and nose. Draw a ribbon for hanging.

This pocket is perfect for storing small items: hairpins, combs or stationery.

Paper Craft for Kids: RACE RACE
Did you know that you can make unusual racing cars with your own hands? Let's create them and have a real race. I wonder what car number will win?
What will be required:
cardboard tubes of paint, felt-tip pens
colored paper, cardboard
glue scissors
Work sequence:
Color the tubes in bright colors.

Cut out parts for cars from colored and white paper (for wheels, it’s better to take black cardboard - then your “car” will stand firmly). Use a felt-tip pen to draw what you need.
Make a hole in the straw as shown in the picture (you can ask an adult to help).

Now glue all the details. Wait until it dries - and go ahead, play!

Paper crafts for kids: PAPIER-MACHE BALLOONS
Who doesn't dream of flying in a hot air balloon? Someday you will definitely do it. Now let's try to make an unusual balloon from an ordinary newspaper.
What will be required:
glue bead
needle spoke
cream paint
Work sequence:
Inflate the balloon, lubricate it with any cream. Prepare a newspaper for crafts - for this you need to tear it into small pieces. Wetting them in water, glue the ball so that there is no gap.

Now apply a layer of glue on the ball and glue it again with pieces of newspaper soaked in water - so you need to make 2-3 layers. You may need the help of an adult.

When the ball is completely dry (for this you will need to wait 1-2 days), pierce it with a needle - we don’t need it now - and cut the ball, as shown in the photo.

Now color the ball with paints.

Now let's make a basket. To do this, the newspaper sheet was divided into 4 parts to make rectangular blanks. Then, starting from the bottom corner, roll the newspaper into a tube with a knitting needle, and glue the tip.

Take 5 tubes and put them side by side, and stretch the sixth tube across under the first, over the second, under the third, etc., alternating. The next tube must be weaved in reverse: what was below will be on top.

To secure our base, take one tube and weave it around, also passing it between the other tubes through one.

Now you can make the basket itself: to do this, bend all the ends up and start weaving them around in the same way as you did before. Weave 4 rows.

Unnecessary ends weave on top and glue, some you can just cut off. Color the basket with gouache.

Make holes at the bottom of the ball and secure the basket with a thread. The balloon is ready!

FUNNY ANIMALS
It turns out that you can quickly and easily make yourself a striped friend. And in order to be able to play with friends, let's find out how to make not only a tiger, but also other animals.
What will be required:
colored paper
glue scissors
Work sequence:
Take a sheet of colored paper and fold it as shown in the picture. Glue the ends to make a strip.

Bend the strip "accordion" in three places to get the letter "M".

Cut out blanks for the animal from colored paper.

Glue the blanks to the base. Ready! You have a tiger.

HOME THEATER
But what if you arrange a real theater in your home? It will be possible to invite adults to the performance and show them some kind of fairy tale, for example, "Gingerbread Man". I think they will definitely appreciate your skill!
What will be required:
colored paper compasses scissors glue
markers stick
Work sequence:
Draw a blank on a sheet of colored paper, as shown in the photo.

Cut out the blank and glue.

Cut out the base for the animal from colored paper
Glue the pieces to the base. Look who we got

Take your favorite animal fairy tale as a base and make all the characters out of paper. If sticks are glued to the blanks, it will be possible to show a performance from behind a screen, as in a puppet theater.
Paper crafts for kids: FUNNY CATERRORS AND SPIDERS
Have you ever seen a real spider? And the caterpillar? Let's make funny animals with furry legs out of a cardboard egg box. They will look like the real thing!
What will be required:
egg carton
glue scissors
colored paper
wire
Work sequence:
Cut out blanks from a cardboard box: three cells for caterpillars, one for bugs and spiders.

Color the blanks with gouache.

Prepare details for animals: cut out eyes from colored paper, make legs from fluffy wire.
Make holes in the blanks and stick the legs. Then glue on the eyes.

Try to make them exactly the same.

AMAZING MASQUERADE
You can celebrate your birthday in an unusual way by throwing a masquerade. Invite your friends and have everyone make an animal mask for themselves. It will be fun!
What will be required:
cardboard plates
colored cardboard and paper
scissors
Work sequence:
Color the plate blue.

Cut out the ears and color them too.

Prepare parts for a bunny from colored paper.
Cut out holes for the eyes and glue the pieces as shown.


PAPER BEADS
What girl doesn't love jewelry? Let's try to make beads from old magazines. You will get bright ones that you can wear with your favorite dress or give to your mother.
Work sequence:
Cut out the details from the magazine sheet: strips about 1 cm wide and elongated triangles.

Wind the blanks on the knitting needle - these will be paper beads. Glue the tip well.

Make as many beads as you need for the entire decoration. Take a needle and thread and carefully thread all the beads onto the thread.

This is how easy it is to make unusual ones: original multi-colored beads, bright bracelets. You can even give them to someone: what girl would refuse such beauty?!
Paper Crafts for Kids: PRINCESS DECORATIONS
All girls dream of becoming real princesses. What is a princess without a crown? Let's make it from a regular cardboard roll.
What will be required:
cardboard tubes of paint
colored paper
scissors
Work sequence:
Cut out the crown. You can do a few things.

Color the blanks in different colors.

Decorate crowns. To do this, you can use beads, ribbons and laces.
Make holes on the sides and thread the elastic so that the crown can be put on.

You can make a decoration for a real princess from an ordinary hoop: use colored paper to turn it into a beautiful diadem.
Paper craft for kids: TOY LOCKER
Probably, like all children, you have a lot. Sometimes there are so many of them that it becomes difficult to neatly fold. Let's make a beautiful storage cabinet for small toys.
What will be required:
boxes of different sizes
white gouache
patterned napkins
stationery knife
tassel pen
Work sequence:
Paint the boxes white so that the pictures and text on them do not show through.

Glue the box on all sides with a napkin. To do this, put it on the box, pressing along the edges, and with a brush, apply a thick layer of glue on top so that it sticks.

Cut out the doors with a clerical knife - here you will need the help of an adult. Glue the handles with superglue and fasten the boxes together to make a cabinet.
All! Our dresser is ready. Now you can put your toys there. Mom will be delighted when she sees what order you have!

CREATIVE BOX
Do you like to draw? Or maybe you like to carve or craft something? This is cool! Let's make a creative bag-box where you can put everything you need for creativity.
What will be required:
shoe box
wrapping
colored paper
adhesive lanyard
Work sequence:
Tape the box and lid on all sides. If it's hard for you, ask one of the adults about it.

Make blanks inside the box. At the bottom of a sheet of colored paper folded in half, make an incision to the middle, as shown in the photo. Cut two pieces of the same length as the width of the box from top to middle.

Insert the blanks into each other and place them in the box - these will be the compartments of our bag.
Make holes on the sides of the box: they should be at such a level that the box can be closed with a lid. Make the handles of the same length from the cord so that the box is comfortable to take in your hand.

HANDMADE PHOTO ALBUMS
Where did you last go on holiday? Maybe it was a trip with your parents to the sea or a vacation in the village with your grandmother? You must have some memorable photos. Let's make a suitcase-shaped photo album for them.
What will be required:
colored paper and cardboard
hole punch scissors lace
Work sequence:
For the cover of the photo album, take a sheet of colored cardboard and fold it in half.

For pages, take sheets of double-sided paper of different colors and also fold in half.

Now connect the cover and pages together: for this, fold everything together and make holes on the side with a hole punch. Tie the sheets with a rope or cord.

Cut out the details for the suitcase from colored cardboard and glue them to the photo album.


Paper Crafts for Kids: FUNNY BOOKMARKS
What is your favorite book? Or maybe several? It's great that you love to read. Let's make an interesting bookmark for the book.
What will be required:
colored paper
Work sequence:
Use a ruler to draw three squares on a sheet of colored paper, as shown in the photo. The triangles that are filled in are not needed.

Cut out the piece.

And it, as shown in the photo: first bend it to the inner corner, then another on top of it. Glue them together. Cut out the details from colored paper.

It turned out great, right? Now it will be easy to find the place in the book where you finished reading. You can also make a bookmark in the form of another animal, such as a dinosaur with sharp teeth.

CARDBOARD BAG
Do you know how you can make a bright bag out of an ordinary box? Very simple! Let's dream up and make a handbag that you can take with you outside in sunny weather.
What will be required:
cereal box
colored paper
glue scissors
Work sequence:
Color the box with gouache.

Cut out a bag with handles from the box. This may require the help of an adult.

Cut out a strip and a circle from colored paper - this will be the core of the flower. Fold the strip with an accordion and glue the ends. To keep the flower, stick it on a small square. Glue the core on top.

For butterflies, cut out blanks from 1 colored paper. To make the figure voluminous, you need to make 5-6 identical parts. Glue them together in the middle. Glue all the pieces to the box.

DIY Paper Crafts: Pencil Stand
Do you want to give a gift to a friend, but don't know what to choose? Don't be upset, I have an idea! Make an original stationery stand out of an ordinary cardboard box. Your friend will definitely love this gift!
What will be required:
boxes
the same width
white and colored paper, cardboard
adhesive tape
Work sequence:
Build a ship out of boxes: cut off the lids and cut them to height. Make the bow of the ship and pipes out of cardboard.

Tape each piece with colored paper inside and out.

Cut out and glue the windows, lifebuoy, steering wheel, anchor.

Glue the boxes together and glue them to the base, cut along the contour.

PUZZLE APPLICATION
Do you have unnecessary puzzles in which a lot of details are already lost? I have an idea how they can be applied. Let's make an amazingly colorful application with autumn leaves.
What will be required:
unnecessary puzzles crepe paper
paint glue
Work sequence:
Color the puzzles in the colors of bright autumn leaves: yellow, orange, red.

Cut out a brown rectangle from crepe paper - this will be a tree trunk - and make green grass.

Glue the brown blank in the form of a trunk: for this, somewhere you need to compress the paper in layers, and straighten it somewhere.
Make a crown of a tree from the prepared puzzle pieces. Also glue several layers of grass to make it voluminous.


Paper crafts for kids: 3D PICTURE
Do you want to make a large application? It's quite easy! You will get a real picture that you can give to your grandparents.
What will be required:
candy box
corrugated cardboard
double tape adhesive
Work sequence:
Cut out the necessary details for the picture from corrugated cardboard.

Glue the first layer of applique on the bottom of the box - what will be in the background.
Paste other details on top.

What a beauty! It turned out to be a real big picture. In this way, you can make a city where there are cottages and high-rise buildings, or an underwater world with shells, algae and fish.

BOUQUET IN A POSTCARD
Do you want to give your mom unusual flowers? Let's make a card-bouquet of colored paper. Trust me, she'll love it.
What will be required:
double-sided colored paper
scissors ribbon
Work sequence:
Draw a blank on a sheet of colored paper, as shown in the figure.

Cut out the blank and separately a triangle.
Glue a small triangle on the bottom, and fold the large part as shown in the picture.

Draw, and then cut out flowers of different sizes and colors. Make leaves for the bouquet.

Glue flowers inside our postcard in the form of a bouquet, tie a ribbon at the bottom.


3D POSTCARD
Surely you watched the cartoon in 3D and noticed how the characters come to life with a three-dimensional image. It turns out that making objects three-dimensional is quite simple. Let's try to make a postcard with a 3D effect.
What will be required:
colored cardboard, double-sided colored paper
scissors ribbon
Work sequence:
Take two sheets folded in half: one is cardboard, the other is colored paper.
On a sheet of colored paper, make cuts on the fold side, as shown in the photo. You should get 3 even squares of different sizes.

Now what you cut, push forward and inward. You should get a ladder, as if from boxes.
Glue the blank onto a sheet of colored cardboard. Decorate the boxes: glue colored paper and ribbons.

By this principle, you can make a card with balloons

CARD WITH PALM
Do you want to make another unusual postcard? You don’t need anything special for this: just a sheet of colored paper and cardboard, scissors, glue and your wonderful pens.
What will be required:
colored cardboard and paper
Work sequence:
Circle your palm on a piece of cardboard.

Cut out the piece with scissors. You will need two of these items.
Cut out a strip of colored paper and fold it like an accordion.

Glue one end of the accordion to one "hand" and the other to the other. Cut out from colored paper or write a congratulation with felt-tip pens.

ENVELOPE
Do you know how to decorate a small gift? You don't have to be an adult to do this, and you don't need any special equipment. Repeat after me and you will definitely succeed!
What will be required:
colored paper glue
ribbon
Work sequence:
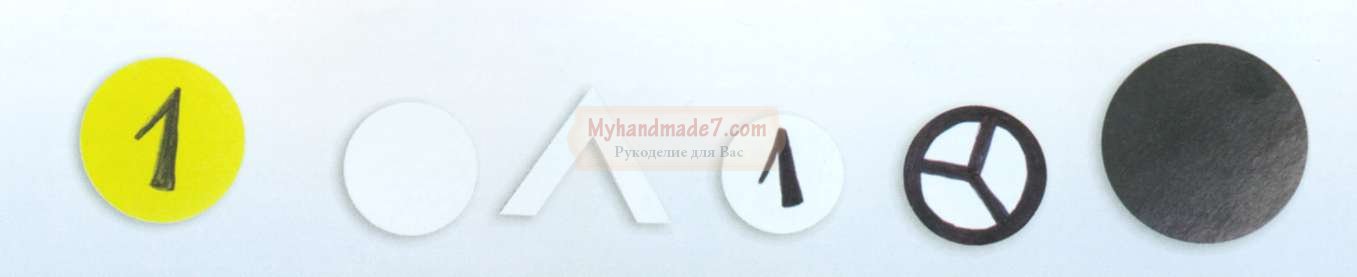
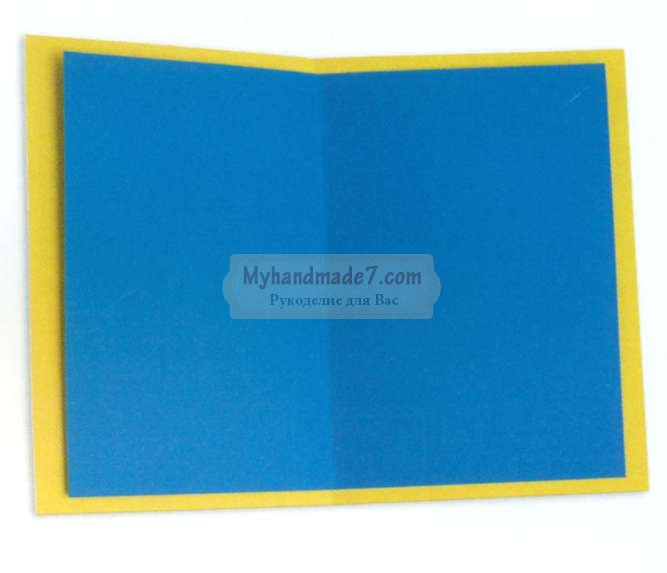
Draw 4 identical circles on a sheet of colored paper. This is easy to do if you take a mug, put it upside down and circle it.

Cut out the circles and fold them in half.

Glue the circles together as shown in the picture.
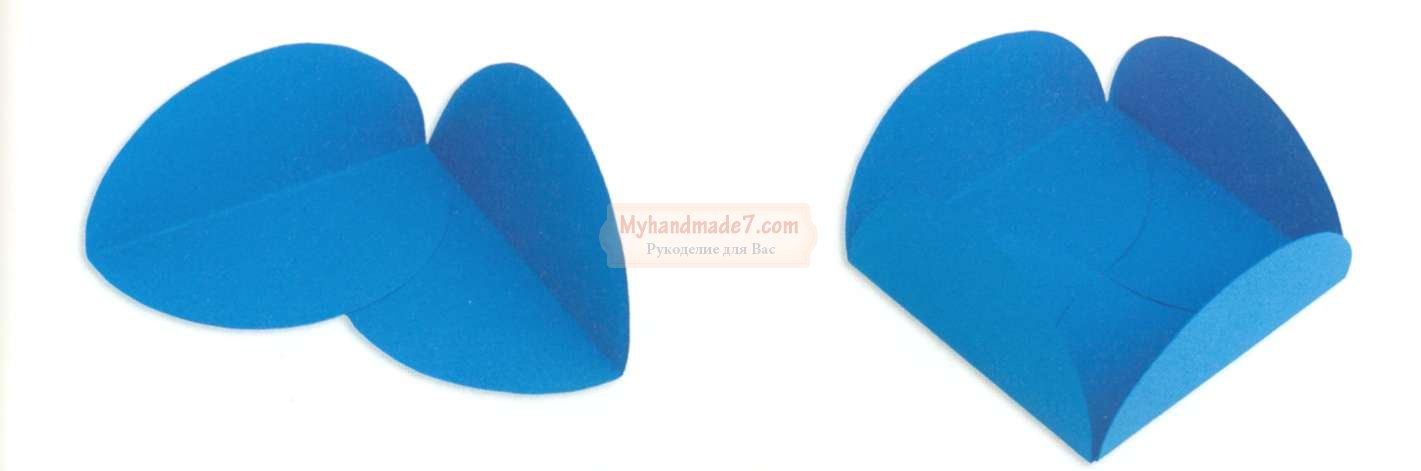
Bend the free halves of the circles so that one turns out on top of the other. Then pull the bottom from one side up.

SWEET GIFT
Have you ever seen a gift shaped like a candy? Maybe they gave you something similar? Let's make such a surprise, and you can "treat" someone to them.
What will be required:
cardboard tube
wrapping paper glue
scissors ribbon
Work sequence:
Cut out a square from the wrapping paper. In size, it should be larger than a cardboard tube.

Cover the tube with paper. Tie one end of the candy with a ribbon.

Put candy in a gift and tie the other end.
3D FIGURINES
Have you ever wanted to decorate your room in an unusual way? Let's make voluminous figurines-decorations from colored paper. They can be placed on a bedside table or hung on a string from a chandelier.
What will be required:
colored paper glue
scissors ribbon
Work sequence:
Draw a half of an apple on a piece of colored paper folded in half, as shown in the photo.

Cut out the blank and, using it as a template, make 5 such copies. Additionally, cut out the details for the apple.

Glue the blanks together, as shown in the photo.

Glue the rest of the details.

Fruits and vegetables can be anything!
Crafts from cardboard and paper: bright flowers
Do you want to grow bright flowers in your window? Let's make them out of cardboard tubes, but in such a way that no one guesses what material they are from.
What will be required:
cardboard tubes of paint
colored paper glue
scissors skewers
Work sequence:
Make cuts on both sides of the tube so that they do not reach the middle.

Color the tubes in different colors.

When the blanks are dry, straighten the petals, as shown in the photo.
Glue the centers cut out of colored paper.

Paste the skewer with colored paper, cut out the leaves.
Connect all the details. Poke a hole in the center of the flower with a skewer.
Such a flower can be put in a vase and presented to someone.

FRAME OF UNUSUAL FLOWERS
Do you have a boring monochrome frame at home? Let's make it a real masterpiece!
What will be required:
egg carton
glue scissors
Work sequence:
Cut out petal blanks from the cells of a cardboard box, as in the picture.

Color them the same color. You should have 15-18 such sets of different colors (depending on the size of the frame).

Glue the petals together in the middle, carefully press and let them dry.
Glue the flowers to the frame. You won’t be able to attach everything at once, so do it in stages and wait until everything dries.

The frame is ready. Now you can insert your favorite photo into it.
CUTE CACTUS
How do you like such a cute cactus? It is completely safe for children because the thorns are painted on it. Let's make such a cactus and put it on the windowsill.
What will be required:
markers
Work sequence:
Draw a cactus in a pot on cardboard.

Color the picture on both sides and make another one exactly the same.

Make cuts: on one cactus from the bottom to the middle, and on the second - from the top to the middle.

Insert the blanks into each other. The cactus is ready.
In the same way, you can make a rocket or a teddy bear.
COLORED LANTERNS
Your birthday is coming up and you want to decorate your room to make it festive and beautiful? Then let's make unusual colored lanterns.
What will be required:
toilet paper tubes
crepe paper
ribbons
glue scissors
Work sequence:
Cut out a square of crepe paper and glue one side of the tube.

Make blanks from crepe paper: cut out strips and make cuts on one side along the entire length.

Start taping the tube from the bottom. You should get a skirt, as in the photo.
Thus, glue the entire flashlight. Make holes on the top sides and thread a ribbon through them so that the craft can be hung.

Such lanterns can be not only decoration, but also a useful thing. For example, at a holiday you can arrange a game with prizes: hang lanterns on a rope and put something valuable in them by gluing the bottom. Each blindfolded guest must cut off a gift with scissors.

ROOM DECORATION
Would you like to have a bird? Of course, nothing compares to the real one, but still an unusual and beautiful bird can be made from ordinary colored paper. See how it's done.
What will be required:
double-sided colored paper
crepe paper scissors
ribbons
wire
Work sequence:
Draw bird silhouettes on a piece of paper.

Cut them out. Make a few of these. They must be different colors.

Make wings out of crepe paper: to do this, cut out rectangles of different colors and fold them like an accordion.
Make cuts in the blanks of the birds and insert the wings there. Tie ribbons to the figures and hang them on a circle made of wire.