This is perhaps the simplest and least expensive type of creativity for children and adults. And there probably won’t be a person who hasn’t launched a paper airplane at least once in his life, and these endless ways to make your plane faster brought so much joy and children’s first victories. In this article we will look at several interesting crafts that you can easily repeat with your children. Creative activities with paper will be interesting not only for kids, but also for children school age. Making paper crafts develops fine motor skills, teaches the child to work with scissors, to be neat, patient and attentive.
And just for children's joy, we need scissors, glue, a couple of sheets of paper, for more advanced users, a couple of colored sheets of paper (cardboard). And you will undoubtedly make your baby happy. In the process of working with very small crumbs, you can remember colors, shapes in a playful way and just have a great time.
Today we would like to offer you several simple techniques that even the little ones can handle to make their own origami.
For the first type of crafts we will need
- Scissors;
- Glue;
- Markers or pens;
- Several sheets of colored paper.
The technique for making such paper crafts is very simple. All we need is to choose our favorite character or animal. Choose the appropriate color of paper and start working.
How to make a paper craft?
Below we will look at three simple paper crafts: a mouse, a bunny and a bee.
As an example, consider making a mouse.
Step 1:
We need to prepare everything necessary for work. To make a mouse, we need to cut out the following elements from paper:
- 1 rectangle (for the body of the mouse). Make the sides of the rectangle pointed, as shown in the example. (this will be the mouse's head);
- 3 thin strips (these will be antennae);
- 1 triangle for the spout;
- blanks for ears: 2 larger ovals and 2 smaller ovals, glue them together;
- blanks for the eyes: 2 larger ovals in white and 2 smaller ovals in black, glue them together;
- 1 ponytail, cut a slightly twisted strip from paper.
Step 2:
Now that we have all the elements of the mouse, we need to attach it with glue. We bend our largest rectangle (torso) in half, but do not press it, glue the front part. We wait until the glue sets.
Step 3:
To the finished main part we glue all the other elements of the mustache, nose, tail and ears and eyes.
Examples of work using similar techniques.


For the second type of crafts we will need
The next type of paper crafts is also very easy to make, but very colorful and bright. Such crafts will also look beautiful as bowls for pens and pencils.
- Scissors;
- Glue;
- Markers or pens;
- Cardboard cone.
For example, consider making a bee

Step 1:
We need to prepare everything necessary for work. To make a bee, we need to cut out the following elements from paper:
- 1 large rectangle the size of a cone that you chose for the craft;
- 3 black stripes;
- blank for wings, make it the same as in the example;
- 1 circle, this will be the face of a bee;
- blanks for antennae.
Step 2:
At this stage, we need to take a cone and cover it with a large rectangle blank.
Step 3:
While the glue on our cone is drying, we can prepare our character's face. Draw eyes and a smile on the prepared circle, then glue on the mustache.
Step 4:
We continue working with the cone, gluing strips characteristic of the bee onto it, at approximately the same distance.
Step 5:
We assemble our bee, glue all the remaining elements onto our cone. The bee is ready.
Examples of work using similar techniques


For the third type of crafts we will need
The third version of crafts is slightly different from the first two. Which will take a little more time and patience to make. But these types of paper crafts look very beautiful and stylish. And they are suitable not only for children's creativity, but also for decorating a room and many other uses.
- Scissors;
- Glue;
- Pencil;
- Several sheets of colored paper;
- Ruler.
As an example, let's look at making a bunny.

Step 1:
We need to prepare everything necessary for work. To make a bunny, we need to cut out the following elements from paper:
- circle, this will be a blank for the bunny’s face;
- 4 oblong ovals for ears (2 a little larger, 2 a little smaller) glue them together to make ears;
Step 2:
We need to make the base of our bunny. Take a sheet of A4 paper, now we need to make something similar to an accordion. To ensure that our bunny turns out even in the end, use a ruler to divide the A4 sheet into even parts. Now, along the outlined lines, we bend our leaf into an accordion. To make the bunny bigger and more prominent, you can make several of these accordions

Step 3:
The next stage of our work is to fasten our finished accordions together with glue to form a circle.
Step 4:
We glue our bunny's face and finished ears onto the finished circle. You can make several of these bunnies and fasten them together with a thread, and decorate the room with such a cute garland made by yourself.
Examples of other works performed using similar techniques.


We hope our article was useful to you, leave your comments and send us photos of your work.
Time runs inexorably forward and now white flies are flying outside the window, slowly falling to the ground and covering everything around with a snow-white fluffy blanket. However, despite the cold, my soul is warm and joyful. And all because suddenly appearing snowflakes herald the coming of the New Year. The most important holiday of the year is already very close, which means it’s time to think about New Year’s decor, gifts and, of course, crafts.
The days are getting shorter and the evenings are getting colder and longer. What to do with yourself, and especially with your little fidgets, when it’s too dark for outdoor winter fun? Well, of course, crafts. New Year's crafts can be made from the most unexpected materials: cocktail straws and much more. But there are also more traditional materials, such as paper. In this article, we have collected for you more than 60 step-by-step master classes on making paper crafts for the New Year. If you still think that only appliques can be made from paper, then drop everything and carefully look at our article! Well, for those who are looking for something unusual and know what miracles can be created from ordinary paper, we can only advise them to immediately begin the process of creating New Year's paper crafts using our patterns and templates.
One of the simplest New Year's paper crafts can rightfully be considered a garland. We all remember well from our childhood how we decorated the Christmas tree with such paper garlands not only at home, but at school or kindergarten. Making a paper garland is very simple: colored paper is cut into strips of the same width, the first strip is glued into a ring, and each subsequent one is threaded into the previous ring and also glued. This paper craft is ideal for 4-5 year olds.
If the task of entertaining children is not important, but you need to decorate the house, then here is another option for a paper garland. It is even easier to do than the previous one, but you will need a sewing machine. So, to create such a New Year's paper craft you will need: many circles of different diameters (the number depends on the size of the garland), a sewing machine. Sew circles through the center using a machine and hang the garland. Such a garland will “come to life” from any gust of air.

So, if you have decided that the issue with garlands is closed and there is nothing more to come up with here, we hasten to upset you - this is only the very tip of the iceberg. Simple paper garlands are an activity for beginners. Professionals prefer more complex tasks, for example, voluminous paper crafts. Below is a master class on making a three-dimensional garland in the form of light bulbs.

By the way, you can decorate an ordinary LED garland with paper lanterns. This New Year's paper craft looks very cool, especially if you decorate a wall with this garland.

Interested in a garland? Then see more ideas:

New Year is the most favorite holiday, associated with miracles and magic. Celebrating the new year is characterized by folk festivals and joyful meetings. It is impossible not to love this time of year, when everything around is transformed, and every house or storefront becomes like the scenery of a fairy tale. Everyone wants to participate in this transformation, and therefore they try to decorate their homes […]
Since we are talking about apartment decor, it would be strange not to mention Christmas or, as they are also called, New Year’s wreaths. Anyone can make such a paper craft; in addition, a New Year's wreath made of paper is a reusable decoration that will not deteriorate or lose its appearance over time.

A very cool paper craft for the New Year - a wreath of roses. You will have to work hard to create such a craft, so if you decide to make yourself such a paper wreath for your door, be patient and in good spirits!

If you are planning a themed party for the New Year, say in a Cuban or Hawaiian style, then you will definitely need some kind of decoration to create the atmosphere. This simple but very original paper wreath will come in handy!

Surely your child at school or in the garden was asked to make a Christmas wreath together with his parents. Ostensibly for a competition, but the main goal of this task is to force parents to spend time with their children. But maybe you shouldn’t wait for assignments from school, but spend time with your child yourself. In addition, with such a New Year's craft you can decorate your home in a very original way, and most importantly, get a lot of positive emotions!

Need a New Year's wreath? See more ideas:

Preparing for the New Year is sometimes even more enjoyable than the celebration itself. The whole family, including the youngest residents, can take part in the interior decorating process. You can decorate an apartment or house for the New Year holidays in a variety of ways, but recently New Year's wreaths, which we know better from romantic Hollywood Christmas films, have become very popular. However, fashionable […]
So, we continue to decorate the apartment. There is a garland, there is a wreath. Something is missing? Oh, of course, Christmas trees! If you prefer to display a large forest beauty for the New Year holidays, no problem. By the way, read. Small paper Christmas trees will be a great additional decorative element, and they can also be used as small souvenirs for guests!
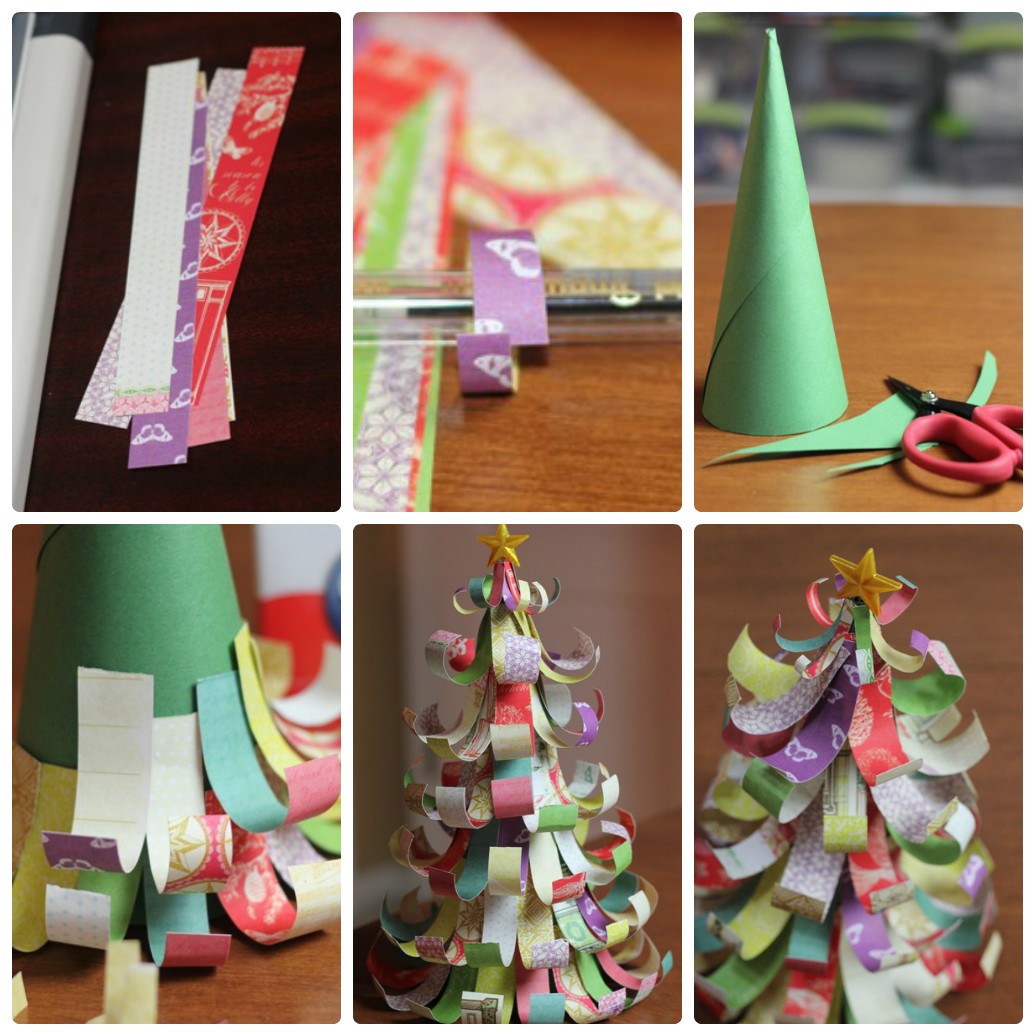
#10 DIY New Year's paper crafts: making a Christmas tree toy “Christmas tree”
A paper Christmas tree doesn’t have to be on a table or somewhere in the house. You can make a craft out of paper, which you can then hang on the Christmas tree itself, and if there is no Christmas tree, then you can simply hang such voluminous paper Christmas trees around the house. The pattern for making a Christmas tree is quite simple, but if you don’t quite understand what the point is, or you simply don’t have time to figure it out, then you can download a ready-made template.

A very cute Christmas tree can be made from corrugated paper. This paper craft looks very realistic, and is quick and easy to do.

If you are still interested in a paper Christmas tree, but want to make something unusual, then take advantage of this master class.

The Christmas tree does not have to stand on the floor; it can also be hung from the ceiling. An excellent Christmas tree garland can be made from plain paper.

How to distinguish a New Year's table from a regular holiday one? Everything is correct! By thematic decorative elements. See how to make a suitable New Year's dessert.


Do you want more master classes on making a Christmas tree out of paper? See:

The New Year tree is, of course, the main attribute of the most important winter holiday. You won’t be able to do without the forest beauty, the atmosphere is not the same, and where will the kind grandfather put the gifts? It just so happens that people in the house decorate a Christmas tree for the New Year holidays: some people put up a live one, some prefer an artificial one, and some prefer a paper one. A paper Christmas tree can not only replace a Christmas tree [...]
#17 New Year's paper crafts: making a moving card with wishes
You can make not only flat or three-dimensional crafts from paper, but also movable ones. With our ready-made scheme, you can make a postcard with an encrypted greeting or message. Such an unusual gift will delight not only children, but also adults! You can download the finished diagram below.


In winter, wildflowers cannot be found, even in flower shops. But there’s nothing to worry about, you can make flowers out of paper with your own hands. And our step-by-step master class will help you with this.

You can make a wide variety of flowers from paper, the whole secret is in cutting out the ends.


If you want to make a large New Year's star to decorate a wall from paper tubes, then this master class is especially for you!

A very themed New Year's craft made from crimple paper. This paper cone looks very natural and is quite difficult to distinguish, especially if it is used as decoration. With our master class you can easily cope with such a paper craft.

There is another technique for creating a paper cone with your own hands. This method is more labor-intensive and will take you longer. In addition, to create such a New Year's craft you will need: paper, foam blank, a lot of safety pins, ribbon and beads for decoration. However, if you have the time and desire, then pay special attention to this pattern for making a cone, especially if you want to make an impression.

You can make very special crafts from paper using the Japanese origami technique. Our step-by-step master class will help you create a New Year's ball out of paper, which can be used to decorate both a room and a Christmas tree.

Step-by-step diagram for creating an origami star with your own hands. You can decorate the top of the Christmas tree with such a star, you can simply create a festive atmosphere in your home, or you can combine it into one large garland.

You can make the base yourself, as in the first picture. Or you can download a ready-made pentagon blank and depending on the size of the pentagon the size of the finished star will change.


At your service step by step diagram making three-dimensional snowflakes from paper. Follow the instructions and you will definitely get such a miracle.

#34 Decorating the apartment with pine cones: do-it-yourself New Year's paper crafts
In continuation of New Year's paper crafts, I would like to offer you another scheme for making paper cones. In addition to paper circles, you will need an oval or round blank, glue and spruce branches for decoration.

Another great option for decorating your apartment with your own hands is a large voluminous snowflake on the wall. There can be not just one snowflake, but a whole ensemble. Plus, this Christmas background will make for great photos!

A New Year's gift must be in beautiful packaging. In my opinion, the gift itself is not so important as the intrigue around it. After all, it is this intrigue that will remain in the memory, this pleasant expectation and unfolding of the paper. Use our DIY paper flower making pattern and decorate gifts for loved ones.

It is customary to decorate the New Year tree with toys, but these toys do not necessarily have to be purchased. It's even better if they are made by yourself. What could be easier than making a paper Christmas tree toy? Take advantage of our step by step instructions and make your own Christmas ball out of paper.

Very simple, but incredibly cute three-dimensional lanterns can be made from ordinary colored paper. Even children can handle this craft, so feel free to get to work if you have little helpers. Well, if not, then you can handle it yourself!

You can make completely unexpected crafts from paper, including gift boxes. And not just boxes, but in the form of delicious sweets. For such a gift box you will need: a cardboard cylinder, colored paper, glue, scissors, satin ribbon.

Continuing the question of gift wrapping, we would like to offer you another budget, but very charming option. You can make such a gift elf with your own hands using our master class.

Here is another option for original DIY New Year's gift packaging.

Need more gift wrapping ideas? See:

On the eve of the New Year holidays, store windows are full of gift boxes, decorative bags, and wrapping paper for every taste. Smiling sellers helpfully offer to provide wrapping services for New Year's gifts. And all this seems great, because you must admit, it’s much nicer to receive a New Year’s trinket in a beautiful package. But on the other hand, the whole meaning of the gift is lost, the very gift that should […]


Want more Christmas ball ideas? See:

Today you can find a huge number of different Christmas tree decorations on store shelves, so turning an ordinary Christmas tree into a real holiday beauty is not difficult. However, New Year is a special day! The day when the old year is left behind, and new adventures, new events, new victories await ahead. But the old year did not pass without a trace, […]


#55 A simple diagram of a three-dimensional snowflake made of paper: decorating the room for a party

#56 Do-it-yourself voluminous paper crafts: making a snowflake. Scheme


#58 New Year's paper crafts: decorate the house with diamond crystals
Download ready-made patterns and make your own diamond crystals from paper.

#59 DIY Christmas craft paper ball “Mistletoe”
You can make this mistletoe ball out of paper with your own hands using ready-made cutting templates. Be patient and have a New Year's mood!


You can decorate your house not only with standard snowflakes or stars. You can make such a wonderful vase out of paper. Download the finished diagram and assemble the vase following the instructions in the master class.

A wide variety of decorative elements can be made from plain paper, just download the ready-made diagram, print it, cut it out and glue it. A wonderful New Year's paper craft is ready!

#64 New Year's cutting patterns: a great photo shoot for the New Year
Note! The templates are very large and of good quality, so downloading may take some time.

Easy-to-make New Year's decorations can be made from paper. Our master class gives an example with a ball, but these can also be other shapes: hearts, stars, Christmas trees and much more. You can download ready-made templates below.

You can make a simple and original Chinese lantern with your own hands using our ready-made diagram.

A composite paper star will be an excellent decoration for the New Year. You can download the ready-made template for gluing below.

Nowadays, you won’t surprise anyone with ordinary paper cutouts. Volume crafts are much more delightful. This master class describes a step-by-step scheme for creating a simple three-dimensional star. You can download a ready-made template with a large, medium and small star using the link below.

It’s quite difficult to imagine New Year’s decor without all sorts of variations on the theme of stars. In this master class you will learn how to make a three-dimensional double-sided star out of paper with your own hands. You can download the finished diagram below.

#70 New Year's paper masks
The list of New Year's paper crafts must include carnival masks. Well, what New Year's party can do without masks? That's right, none! In fact, there are a lot of options for making paper masks, and if you use your imagination, you can make a lot of wonderful crafts!

Any kind creative activity develops the child’s imagination, perception of colors, textures and shapes, promotes the formation of spatial and figurative thinking in general. Thanks to working with applications, kids learn diligence, patience and perseverance. Applique is the simplest and most accessible form of creativity for a child, because children from the age of 2 can glue cut-out figures onto cardboard.
Applications made from colored paper
For most crafts you will need:
- Colored paper or cardboard
- Scissors
- Markers
For children under 3 years old
- Finger crafts
 For such a lamb or dandelion you will need:
- Pre-cut blanks for a muzzle, eyes and legs or stems for a dandelion.
- White non-toxic paint: watercolor or gouache.
Glue the blanks onto the background, mark the boundaries - the circumference of a flower or a lamb. First, you show what needs to be done, and then let the child dip his fingers in the paint and leave fingerprints on the paper, without going beyond the drawn line.
- Crafts-stamps from pompoms
Another type of craft that even the little ones can do.

To make this craft the following is used:
- Pom-poms as stamps,
- Paints.
Craft ideas: Christmas tree, Easter eggs, ice cream scoops, clouds, tree crown, yellow chickens.
- Caterpillar made of circles
First, you will need to draw a line on paper - the basis of the future caterpillar, and then place the circles you cut out on this line. After that, remove them and show the child where to glue the circles.
- Ice cream

For this ice cream you will need:
- Stationery glitter,
- Cosmetic cotton pads.
Cut out an ice cream cone from paper or cardboard, paint cotton sponges yellow, blue and pink. The child’s task is to stick a cone and “balls” of ice cream on paper. Sprinkle the top of the cotton pads with multi-colored glitter, which can be found in any stationery store.
- Rabbit made of cotton pads and plasticine
 Materials:
- Plasticine,
- Spaghetti optional
- Cotton pads - 4 pcs.
You cut one disk in half - these will be the ears, and the second into 4 parts - these will be the rabbit's legs. Spaghetti is used as a mustache, but they can also be made from plasticine. Form balls from plasticine or you can ask your child to make them. Then the child simply glues the details of the craft onto paper, and you make antennae for the rabbit.
- Multilayer applications
 At the age of 2-3 years, children especially love multi-layered appliqués.
You cut out the parts, show them in what order they need to be glued, and entrust the task to your child.
There is a second option for this craft - print a stencil, cut out parts from it and paint them with paints.
 For them you will need:
- Green felt-tip pen or marker,
- Cotton pads.
Cut two cotton pads in half - this will be snow, then cut out snowdrop flowers from the discs and green leaves from paper. And the child is already gluing the details of the flower onto the paper.
For children from 3 to 5 years old
These applications are more complex; the child will have to independently cut out simple parts and glue them onto paper.
- Bunny

For it you need:
- Colored paper for background,
- Green for the grass
- Pink or red for ears and nose.
The child cuts out the parts according to the template, pastes them onto the background and draws the bunny’s mustache and eyes with a felt-tip pen (if there are no blanks).
 To make ladybugs we will use red and black paper or cardboard.
Cut out 4 circles from red paper and 1 oval from black paper. We cut the oval in half, glue its parts onto the background, then glue one red circle, as shown in the image - the ladybug itself, and on top of the fold we glue the second circle, which will be the wings. We do the same with the second bug, then draw dots with black markers. Eyes can be made from paper or drawn with a felt-tip pen.
What you will need:
 Colored paper - dark blue or black for the background, red for the apples, brown for the basket and green for the leaves.
Cut out apples from red paper. We cut the brown paper into 3 long strips and 2 slightly shorter ones. Cut out leaves for apples from green paper. First we glue two apples, then 2 short strips on the side - the edges of the basket. Then we glue two strips, one on top of the apples, the other on the bottom. Glue on another apple. And the final touch is the strip from the basket in the middle.
 First we cut out an oval, which will be the penguin. Then two black hearts are the wings, one white one will be the belly, two orange ones will be the legs and one pink one will be the decoration.
Now let the child simply glue the details onto the background step by step.
- Goose made of cotton wool and seeds
 Materials for the goose:
- cotton wool,
- Colored orange napkins or white napkins and orange paint,
- Pumpkin seeds.
First, draw the outline of a goose on paper.
Glue cotton wool along the contour, glue pumpkin seeds onto the goose’s wing.
We tear the napkin into small pieces and make lumps out of them. We glue these lumps onto the beak and paws of the goose.
Use a felt-tip pen or marker to draw eyes.
- Paper lamb
You can draw such a lamb yourself, cut out the parts from cardboard and paste them onto a stencil, or print out a stencil and paint it. Using this method, you can make other animals - a rabbit, a cat, a dog or an elephant.

Draw the outline of a peacock on cardboard with a simple pencil and cut it out.
We cut out several circles from colored paper (how fluffy the tail will be depends on their number), cut each of them into 4 parts.
From one such part we make an accordion, repeat the same with the rest and glue them into a fluffy tail.
- Cactus

Necessary materials:
Paper: white for the background, green for the cactus and red for the flowers and spines.
In order to make such a cactus, you need to cut out: 3 large circles - this is the largest part of the cactus, which is located at the bottom in the image, 12 circles are slightly smaller in diameter and 3 small circles are the upper part of the cactus. We glue one large circle from below, and on both sides of it we glue two medium circles from above. From the right middle circle up to the left another middle one “grows” and from it up to the right - the smallest one. When the base of the cactus is ready, glue the rest of the corresponding size circles onto these circles and bend them in half. We repeat this procedure a third time and again bend the circles in the middle. Cut small spines from red paper and cut out flowers. Glue all the parts onto the cactus - and you're done!
- Apple tree
From green and red paper, cut out approximately 20 green stripes and 10 red ones. Draw the outline of a tree on brown cardboard, cut it out and paste it onto the background. We glue the ends of the strips together to form a circle, and glue it onto the “tree trunk”.
- Snowman
 The technique for making a snowman is similar to the previous one: we cut out several long strips from white paper, connect their ends - we get a circle. We connect several of these circles together to form a sphere - this is the body of the snowman. We do the same with the head, but for this we use slightly shorter strips. We make a scarf from the red stripe and wrap it around the snowman’s neck. Using a felt-tip pen we draw eyes, a mouth and buttons. To make a carrot nose, cut out 1/4 of a circle as on a stencil and roll it into a cone. For the hat, cut out a circle and cut it like a sun.
- Bouquet of flowers using quilling technique
 At this age, children are already able to create more complex crafts, such as this bouquet.
Quilling is a technique for creating three-dimensional appliqués from rolled strips of paper.
To create such an application you will need:
- 4 green strips of paper for stems,
- 10 shorter ones for leaves,
- 1 long pink one for a bow,
- 5 stripes of red, yellow and blue.
First, we glue long strips of stems onto the background, and glue a bow on top. We glue the ends of the shorter green strips together, slightly squeeze the resulting circle to form an oval from it - these are flower leaves. We twist yellow, red and blue stripes to make flower buds and glue them onto the craft.
- Rose from a lace napkin
 This craft looks very beautiful and is extremely easy to make.
All you need to do is cut off the edge of the lace napkin and carefully twist it into a flower, so that you get a rose.
- Rose made of colored paper
 We draw a spiral on red cardboard, cut out a strip along the line and begin to twist it with our fingers until we get a bud.
The stem for the flower can be made from colored wire.
Cut out leaves from green paper and glue to the stem. Rose is ready!
- Fish - chessboard
 This application is made without glue. To begin, draw the outline of the fish on colored paper and cut it out. We bend the fish in half and start making cuts in the middle. They start approximately after the head and end before the tail. Next, we cut out strips of different colors and different lengths that form the fin.
We insert a strip of one color, for example, orange, in “waves” so that one part is above the cut and the other below it. Same with other stripes. The result should be a checkerboard pattern.
- Volume machine
 Another quite interesting application, which is also very easy to perform.
All you have to do is print out the template, color the car, cut it out and make two cuts on the protruding part at the end.
 This article contains 25 of the most interesting applications and templates for DIY paper crafts for children. It’s no secret that any form of creativity develops a child’s thinking. Paper crafts are a wonderful activity that develops perseverance and patience. In turn, working with scissors, glue, plasticine and cutting out parts of crafts develop fine motor skills.
These crafts are suitable for both home games and activities in kindergarten or classroom. The youngest children can make simple applications that require sticking several figures onto paper. From the age of 3-4, when children begin to master scissors, they can already cut out simple objects from paper and glue them together. Starting from school age, children are already able to make more complex crafts: for example, making applications using the quilling technique or cutting out small figures with a large number of details.
Paper crafts are the largest section in the category of children's creativity. Despite the fact that paper is the most accessible material for needlework, works made from it can be very different: from simple applications to three-dimensional models.
And in order to diversify the standard program of manual labor classes, we suggest that you familiarize yourself with the crafts of preschoolers in our section, where you will certainly find something interesting and original as an idea for creativity.
Contained in sections:
Includes sections:
- Paper plastics. Mastering paper plastic art techniques with children
Showing publications 1-10 of 4659.
All sections | Origami
 Yes, there was a terrible beginning... And people died without a trace, But even in the darkness our native red star shone for us. Ksenia Trofimova Deyanova 2020 marks a significant date - the 75th anniversary of Victory in the Great Patriotic War. Patriotic education of the younger generation is always...
 Municipal State Preschool General Educational Institution "Kindergarten in Bira" Summary of GCD on cognitive development (cognitive and research activities) in the younger group. Subject: "Trip to Paper Kingdom»
Author: Chernigovskaya Marina Dmitrievna p. Bira...
Municipal State Preschool General Educational Institution "Kindergarten in Bira" Summary of GCD on cognitive development (cognitive and research activities) in the younger group. Subject: "Trip to Paper Kingdom»
Author: Chernigovskaya Marina Dmitrievna p. Bira...
Paper crafts - Collective work on making crafts from paper children’s hands in the junior group “We vote for peace”
Publication "Collective work on making crafts from paper children's..."
 Natalya Efrimidi Collective work “We vote for peace” second junior group Program content: Educational objectives: To develop interest in the application, curiosity, to cultivate a friendly attitude towards birds, wildlife, environment. Educational...
 Image library "MAAM-pictures"
 This master class is for teachers and parents. Purpose: for group lessons and individual play for preschool children. Goal: to introduce children to domestic animals and their babies, to teach them to name and compare them by size; develop curiosity, memory,...
Summary of a lesson on paper plastic appliqué “New Year Tree” in the first junior group LESSON SUMMARY Prepared by teacher: Tsibaeva Lyubov Vladimirovna Kemerovo, MBDOU No. 236 Methodological development of educational activities on the topic: “Holiday Christmas tree” Application (paper plastic) Age of students: junior (third year of life) Educational...
 Designing from paper in the senior group on the topic “Butterfly” (origami) Goal: to teach children to design a butterfly from paper. Objectives: educational: - learn to fold the basic shape of origami - double triangle; - strengthening skills in working with paper; developing: - develop...
Paper crafts - Paper craft with accordion "Lark"
 According to the folk calendar, March 22 was called Magpie Day. People associated this March day with the arrival of spring, the arrival of birds, including larks, one of the first birds returning from warmer climes. This melodic singing of his carries far over the expanses of meadows and fields...
 Applique "Hedgehog" Purpose: to create a three-dimensional applique from paper strips. Objectives: - introduce the method of gluing paper strips into “droplets”; - teach how to fold leaves “obliquely”; - develop hand motor skills; - develop Creative skills. Required material:...
Summary of a lesson in the middle group on the application “Mimosa Branch”. Applique of balls rolled from corrugated paper Summary of a lesson in the middle group on the application “Mimosa Branch”. Target. Make the applique “Mimosa Branches” from balls rolled out of corrugated paper. Tasks. Strengthen the ability to analyze a sample; develop fine motor skills of the hands, imagination, thinking, creative...
DIY finger paper theater DIY finger theater based on the fairy tale “Kolobok”. Goal: to create a paper puppet theater with the joint activity of children from the senior group in a visual arts class. Objectives: -develop the desire to convey your idea most accurately, demonstrate...
Probably every mother has a paper craft from her beloved child in her folder or on her desk. Every March 8th or May 9th, a child brings a beautiful paper flower or a postcard with fireworks from kindergarten. In general, paper crafts are popular in preschools.
The site, for example, presents a wonderful idea for making a garland of cute doves. And making flowers from rings will not only create a warm and spring mood in the group, but will also develop fine motor skills, a sense of shape and the ability to combine. The combination of several materials is especially interesting. When they are put together, the pictures turn out to be original, voluminous and very interesting.
The goal of a competent teacher is not only to interest and attract the child to making paper crafts, he must provide support in the implementation of any paper idea. The child himself may not be able to cope with a task that is difficult for him, although he will gladly take on it.
In this article we will explain to you in detail how to make paper crafts. These are simple and accessible designs even to an inexperienced beginner. Thanks to the explanations given in this article, everyone can learn how to quickly fold original shapes from a sheet of paper.
Folding a paper airplane
This is probably the most popular paper construction among children. But this airplane differs from ordinary ones in its flight qualities and shape, similar to a predatory fighter. To get a beautiful airplane, you should fold it from colored paper or make it from white paper, and then paint the design.
The diagram shown shows how to fold such an aircraft. It will fly very far if you launch this paper fighter in a slightly upward direction.
So, you will need a rectangular sheet of paper. And then:
Fold the sheet towards the center line, in half;
Fold the left and right edges at an angle to the center;

Once again we bend the corners on both sides, as the diagram suggests;

Now, the already bent edges should be slightly turned to the outside;

Bend the airplane in the middle and connect the bottom edges;

Along a line spaced from the bottom by a third of the height of the resulting triangle, we bend the edges down and get wings;

Now we turn the previously bent edges outward and straighten the “fender liners”.
The plane is ready for launches and games.
Elegant paper lantern
For this design, prepare colored paper, a ruler, scissors, glue and a simple pencil.
Take a sheet of colored paper and fold it in half. Now, using a simple pencil, draw lines perpendicular to the fold, which start from the edge of the fold and do not reach the opposite edge by about two centimeters (all lines should be the same). The interval between these lines is a centimeter - one and a half. Now, make cuts along these lines.

Next, we unfold the sheet and bend it into a tube along the length of the cuts, with the colored side of the paper facing out, and glue the edges of the tube together. All that remains is to make a handle for hanging the flashlight - a loop from a strip of the same colored paper, which needs to be glued to the top of the resulting cylinder with cuts and the craft is ready.
Let's make a carnation out of paper
You will need: drinking straws (preferably green), beautiful bright red paper napkins and attentiveness.
Cut a strip about a centimeter wide from the napkin; you will need this ribbon later. Now fold the entire napkin like an accordion and tie it with the prepared strip in the center. Turn the napkin over with the knotted side down and carefully bend the napkin sheets to the side, forming fluffy carnation petals. Bend the workpiece in half and “fluff” the petals again.

All that remains is to attach a tube to the “flower” and the paper carnation is ready. If there are only white napkins, then color their edges and ends with a bright red felt-tip pen. If you don't have a suitable straw, you can take some stiff wire and wrap it with green floral tape.
How to make a star out of paper
A paper star is a beautiful, easy to make and cute craft. To make it you will need several paper squares with a side length of ten centimeters.

We bend the upper part of the rhombus - the triangle - slightly to the side so that its edge runs exactly along the edge of the lower triangle, folded towards the middle. In this way, both sides are bent in turn to form fold strips;

Turn your design over and bend it along the fold lines formed in the previous paragraph;

As a result, you should end up with a figure of two nested triangles, so that the inner corners remain inside;

At least four such blanks will be required;
Connect these shapes by tucking one of the triangles of each workpiece into the “pocket” of the inner triangles of the next one;

Move all the shapes to hide traces of connection - the paper star is ready.
How to fold a paper cracker
For those who are learning how to make paper crafts, such a curious figure as a cracker will also come in handy. You will need a large and rectangular sheet of paper. The best thing is to carefully pull out a double sheet from the middle of the notebook. Or an A4 sheet of office printer paper, even a regular newspaper may do.

Fold a sheet of paper into quarters. When you unfold it, you will see two fold lines of different lengths. Fold all four corners of the sheet to the long fold line, it will look like two roofs of houses;
Now, fold this figure in half along the long fold line and you will have a paper trapezoid in your hands;
Bend the corners of the trapezoid on the long side towards the middle, you will get a square shape;
Fold this square in half again so that the curved triangles are inside (they will create cotton);

Your cracker is ready to use; take the sharp end with your fingers and sharply swing the cracker downwards. The clap will occur when the structure suddenly opens, then you can fold the clapper and repeat everything again until the paper structure breaks.
Please note that when folding this clapper, it is not recommended to particularly smooth the paper.
Paper envelope
The envelopes sold in the store are completely standard and monotonous. Although, if you look, you can buy original envelopes, however, exclusive handmade envelopes are of much greater value. And store-bought envelopes are boring, too impersonal to be used for special occasions.

- Take a sheet of standard A4 paper and cut a strip from it to make a square; it needs to be folded diagonally;
- Now bend the sheet so that the folded corner touches the diagonal fold line. Use a ruler and make a fold exactly one-third the length of the square;
- Also, on the opposite side, the first fold, you need to bend the sheet and also by one third. Make sure the corner goes all the way to the edge;
- Where the left and right third parts of the sheet, which you have already folded, converge, you need to bend the corner of the sheet to the left and back;
- Next, this corner can be opened, it will be a pocket that secures the edge of the top flap of the envelope you are making. After a postcard or letter is placed in the envelope, the edge of the flap will be fixed.
- Now the top of the envelope can already be folded, it goes straight into the pocket prepared for it.
A handmade envelope is not just a beautiful craft, but also part of the solid design of your correspondence, cards or letters.

If the envelope itself is made of white paper, then it can be decorated with stickers or colored with felt-tip pens and pencils. An envelope folded from double-sided colored paper has a special chic. The recipient will be pleasantly surprised. Opening the envelope and discovering that inside was a different beautiful color.

As it is now fashionable to say, a 3D ball can be made from velvet paper, cardboard, colored paper, or take pastel paper. Whatever you have in stock or want to buy, use it. This ball looks great in both color and white.

The easiest way is to print ready-made templates; you will need 12 blanks of their characteristic rounded pentagons. If you are doing this for the first time, it will be easier to assemble a large ball - take the appropriate blanks. Cut out twelve pieces and make slits exactly along the lines.

If you plan to hang the ball, then before assembling it you need to fasten a rope to the first part (if the ball will lie somewhere, then this step can be skipped). To do this, stick a piece of tape on the back side of the workpiece and then pierce the hole with a needle, the paper will not tear. Glue the end of the rope and you can start assembling.


The ball itself is assembled quite easily, the slot of each workpiece is inserted into the previous one, and so on in a circle. The assembly is easy for even a first grader.
Beautiful paper box
The box consists of a lid and a bottom, which are made in turn:
Take a square piece of paper and draw lines along its diagonals.
Bend one of the corners so that its tip is directed to the intersection of the lines, in the center. Bend this side again. The edge of the fold should be located exactly along the diagonal strip. If you bend this side, there will be folds that will be used later;

Repeat the operation described in step 2 for all corners of the square;
On both sides, along the fold lines, parallel to one of the diagonals, we make two cuts, stopping at the last fold before the second diagonal;
We bend the other two sides along the cut lines, fold the corners and fold the rectangular lid of our future craft.

The bottom of the box is made in the same way as the lid, but a square blank should be taken with a side size three millimeters smaller than the one from which the lid was made. Then the lid will fit easily but tightly onto the lower part.

So, the above examples demonstrated how to make paper crafts. It’s not difficult, but it’s interesting and allows you to fold very original things out of ordinary paper. All materials are easily accessible, and original crafts will delight you or your child.
How to make a paper carnation


